Hello Guys,
I have trying to install and configure LDAP as its like Active Directory from windows and the reason I have to configure ldap as We have more than 100+users and 100+ servers so creating a new users or adding a new server and granting access to users on that is really a hectic job.so As i googled I found LDAP in first few like.So I will not waste your time and lets start with implementation of the same.
LDAP, or Lightweight Directory Access Protocol, is a protocol for managing related information from a centralized location through the use of a file and directory hierarchy.It functions in a similar way to a relational database in certain ways, and can be used to organize and store any kind of information. LDAP is commonly used for centralized authentication
Install LDAP
The OpenLDAP server is in Ubuntu's default repositories under the package "slapd", so we can install it easily with apt-get. We will also install some additional utilities:
Reconfigure slapd
When the installation is complete, we actually need to reconfigure the LDAP package. Type the following to bring up the package configuration tool:
I will explane how to use it in next blog which also quite easy.
Thank you guys I will appriciate your feed back if you find any error please let me know .
Enjoy.......!
I have trying to install and configure LDAP as its like Active Directory from windows and the reason I have to configure ldap as We have more than 100+users and 100+ servers so creating a new users or adding a new server and granting access to users on that is really a hectic job.so As i googled I found LDAP in first few like.So I will not waste your time and lets start with implementation of the same.
LDAP, or Lightweight Directory Access Protocol, is a protocol for managing related information from a centralized location through the use of a file and directory hierarchy.It functions in a similar way to a relational database in certain ways, and can be used to organize and store any kind of information. LDAP is commonly used for centralized authentication
Install LDAP
The OpenLDAP server is in Ubuntu's default repositories under the package "slapd", so we can install it easily with apt-get. We will also install some additional utilities:
sudo apt-get update
sudo apt-get install slapd ldap-utilsReconfigure slapd
When the installation is complete, we actually need to reconfigure the LDAP package. Type the following to bring up the package configuration tool:
sudo dpkg-reconfigure slapd
You will be asked a series of questions about how you'd like to configure the software.
- Omit OpenLDAP server configuration? No
- DNS domain name?
- This will create the base structure of your directory path. Read the message to understand how it works.
- There are no set rules for how to configure this. If you have an actual domain name on this server, you can use that. Otherwise, use whatever you'd like.
- In this article, we will call it test.com
- Organization name?
- Again, this is up to you
- We will use example in this guide.
- Administrator password?
- Use the password you configured during installation, or choose another one
- Database backend to use? HDB
- Remove the database when slapd is purged? No
- Move old database? Yes
- Allow LDAPv2 protocol? No
Install PHPldapadmin
We will be administering LDAP through a web interface called PHPldapadmin. This is also available in Ubuntu's default repositories.
Install it with this command:
sudo apt-get install phpldapadmin
That will install all of the required web server and PHP dependencies.
Configure PHPldapadmin
We need to configure some values within the web interface configuration files before trying it out.
Open the configuration file with root privileges:
sudo nano /etc/phpldapadmin/config.php
Search for the following sections and modify them accordingly.
Change the red value to the way you will be referencing your server, either through domain name or IP address.
$servers->setValue('server','host','domain_nam_or_IP_address');
For the next part, you will need to reflect the same value you gave when asked for the DNS domain name when we reconfigured "slapd".
You will have to convert it into a format that LDAP understands by separating each domain component. Domain components are anything that is separated by a dot.
These components are then given as values to the "dc" attribute.
For instance, if your DNS domain name entry was "imaginary.lalala.com", LDAP would need to see "dc=imaginary,dc=lalala,dc=com". Edit the following entry to reflect the name you selected (ours is "test.com" as you recall):
$servers->setValue('server','base',array('dc=test,dc=com'));
The next value to modify will use the same domain components that you just set up in the last entry. Add these after the "cn=admin" in the entry below:
$servers->setValue('login','bind_id','cn=admin,dc=test,dc=com');
Search for the following section about the "hidetemplatewarning" attribute. We want to uncomment this line and set the value to "true" to avoid some annoying warnings that are unimportant.
$config->custom->appearance['hide_template_warning'] = true;
Save and close the file.
Log Into the Web Interface
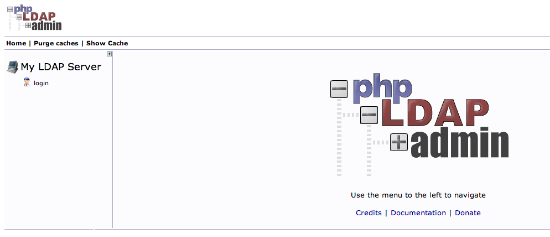
You can access by going to your domain name or IP address followed by "/phpldapadmin" in your web browser:
domain_name_or_IP_address/phpldapadmin
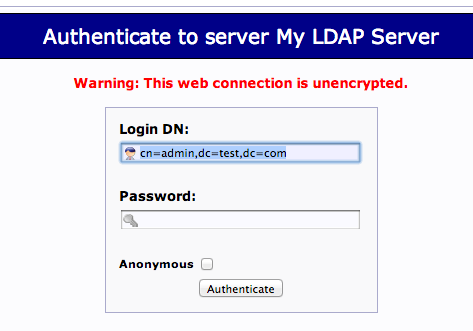
Click on the "login" link on the left-hand side.
You will receive a login prompt. The correct Login DN (distinguished name) should be pre-populated if you configured PHPldapadmin correctly. In our case, this would be "cn=admin,dc=test,dc=com".
Enter the password you selected during our slapd configuration.
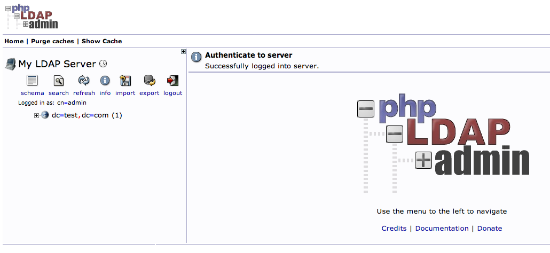
You will be presented with a rather sparse interface initially.
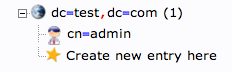
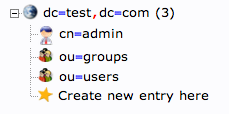
If you click on the "plus" next to the domain components (dc=test,dc=com), you will see the admin login we are using.
Add Organizational Units, Groups, and Users
LDAP is very flexible. You can create hierarchies and relationships in many different ways, depending on what kind of information you need accessible and what kind of use case you have.
We will create some basic structure to our information and then populate it with information.
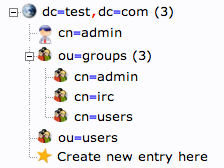
Create Organizational Units
First, we will create some categories of information where we will place the later information. Because this is a basic setup, we will only need two categories: groups and users.
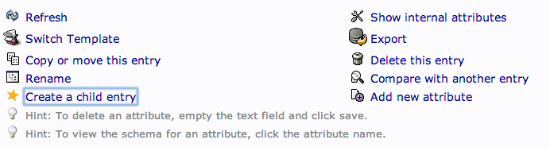
Click on the "Create new entry here" link on the left-hand side.
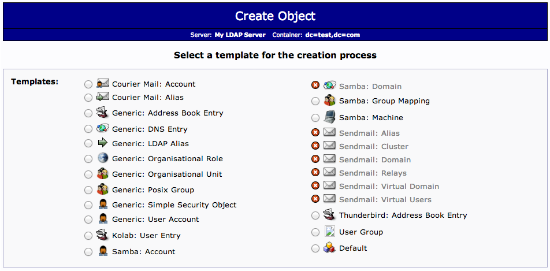
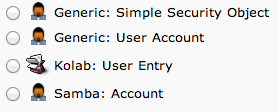
Here, we can see the different kinds of entries we can create.
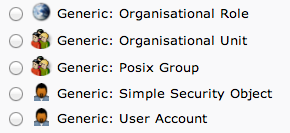
Because we are only using this as an organizational structure, rather than an information-heavy entry, we will use the "Generic: Organizational Unit" template.
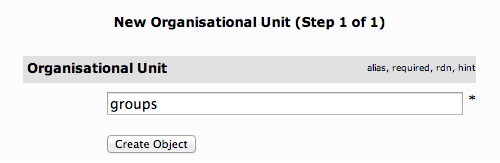
We will be asked to create a name for our organizational unit. Type "groups":
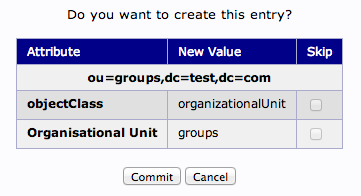
We will then need to commit the changes.
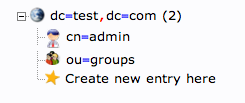
When this is complete, we can see a new entry on the left-hand side.
We will create one more organizational structure to get ourselves going. Repeat the procedure, but this time, use the name "users".
When you are done, you should have something that looks like this:
Create Groups
We will be creating three different groups that could be used to organize users into different "access" groups based on the privileges they require.
We will create an "admin" group, an "irc" group, and a "user" group. We could then allow members of different groups to authenticate if we set up client LDAP authentication.
We want to create the groups within the "groups" organizational unit. Click on the "groups" category we created. In the main pane, click on the "Create a child entry" within the groups category.
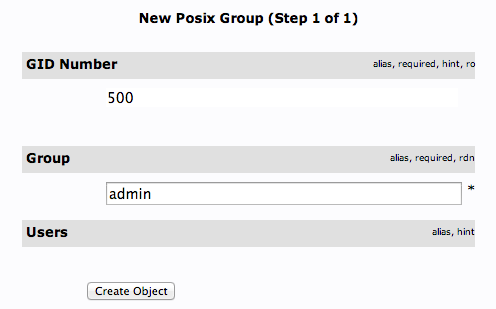
This time, we will choose the "Generic: Posix Group" category.
Fill in "admin" as the group name. Click "Create Object" and then confirm on the next page.
Repeat the process, but simply replace the "admin" name with "irc" and "user". Be sure to re-click the "ou=groups" entry before creating child entries, or else you may create entries under the wrong category.
You should now have three groups in the left-hand panel:
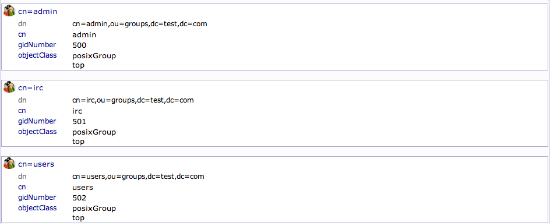
You can see an overview of the entries in the "ou=groups" category by clicking on that entry, and then clicking on "View 3 children":
Create Users
Next, we will create users to put in these groups. Start by clicking the "ou=users" category. Click on "Create a child entry".
We will choose "Generic: User Account" for these entries.
While adding a user you can face a tipical problem like there is no textbox for password and instate of textbox there is some error message some thing like this:
"Error trying to get a non-existant value (appearance,password_hash)"
solution to this problem is as below:
replace password_hash with password_hash_custom which is in /usr/share/phpldapadmin/lib/TemplateRender.php file on line no 2469 and reload the page
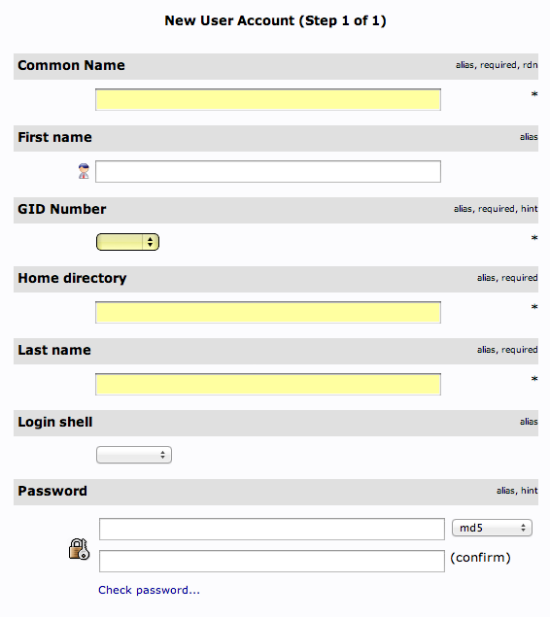
We will be given a lot of fields to fill out:
Fill in all of the entries with information that makes sense for your user.
Something to keep in mind is that the "Common Name" needs to be unique for each entry in a category. So you may want to use a username format instead of the default "FirstName LastName" that is auto-populated.
Click "Create Object" at the bottom and confirm on the following page.
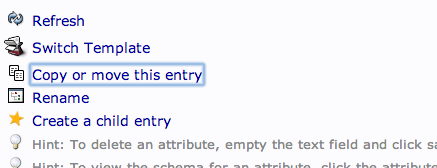
To create additional users, we will take advantage of the ability to copy entries.
Click on the user you just created in the left-hand panel. In the main pane, click "Copy or move this entry":
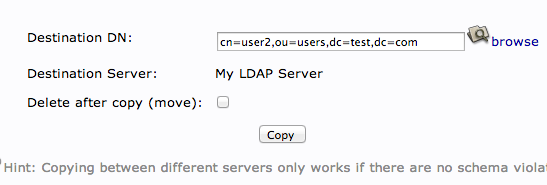
Adjust the "cn=user" portion of the entry to point it to the common name you'd like to use for the new entry. Click "Copy" at the bottom:
You will be given the next page populated with your first users data. You will need to adjust it to match the new users information.
Be sure to adjust the uidNumber. Click the "Create Object" button at the bottom.
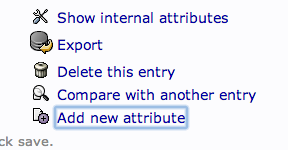
Add Users to Groups
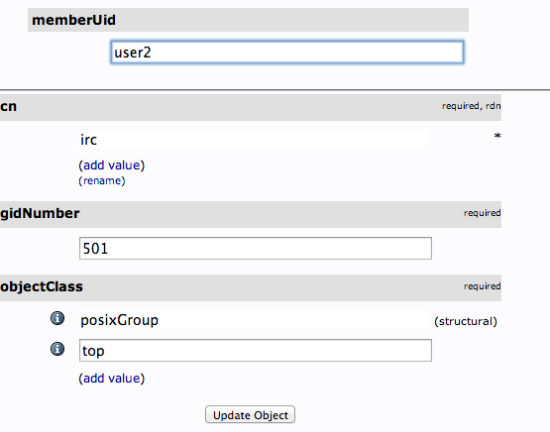
We can add users to various groups by clicking on the group in question. In the main pane, select "Add new attribute":
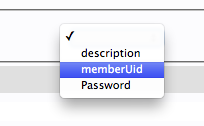
Select "memberUid" from the drop down menu:
In the text field that populates, enter the first user you'd like to add. Click "Update Object" at the bottom:
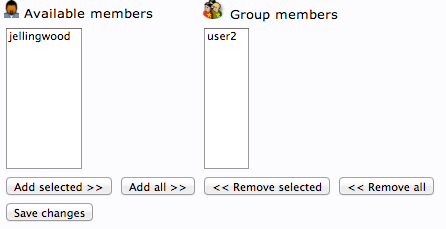
You can then add more members by clicking "modify group members" and selecting them from the available choices:
I will explane how to use it in next blog which also quite easy.
Thank you guys I will appriciate your feed back if you find any error please let me know .
Enjoy.......!
No comments:
Post a Comment