Monday, September 12, 2022

GitLab to Github Migration in Easy steps

 Hello Guys,

Its been a long time but recently i have tasked with migrating some of the gitlab repo to github and our objective is to migrate all the branches from gitlab repo to github and we have active it below steps

1. clone the repo which we need to migrate

   git clone <gitlab repo URL>

2. using the below custom git command we are scanning all the remote repos available on the gitlab

git branch -r | grep -v '\->' | while read remote; do git branch --track "${remote#origin/}" "$remote"; done

3. using get fetch and git pull we are pulling all the repos to the local check

  git fetch --all

  git pull --all

4. Add the Remote of github repo to this repository 

    git remote add github <github URL>

5.  Push the changes on the GitHub 

     git push --mirror github

In the above 5 easy steps we have migrate the all branches with history intact to github.

Friday, June 25, 2021

Kubernetes Dashboard SSO OIDC with keycloak-Part2

 Kubernetes does not have its own user management and relies on external providers like Keycloak. First we need to integrate an OpeniD prodiver (for me keycloak) with the kubernetes api server.

nano /etc/kubernetes/manifests/kube-apiserver.yaml
...
    command:
    - /hyperkube
    - apiserver
    - --advertise-address=10.10.40.30
...

    - --oidc-issuer-url=https://192.168.56.162:8443/auth/realms/mydomain
    - --oidc-client-id=k8s
    - --oidc-username-claim=email
    - --oidc-groups-claim=groups
    # for self sign cert or custom ca
    - --oidc-ca-file=/etc/kubernetes/pki/rootca.pem
...

systemctl restart docker kubelet

Make you have working ingress controller is also installed on your kubernetes cluster.you can install the same using helm or maually.

helm install stable/nginx-ingress \
    --name nginx-ingress \
    --namespace=nginx-ingress \
    --set rbac.create=true \
    --set controller.kind=DaemonSet \
    --set controller.hostNetwork=true \
    --set controller.daemonset.useHostPort=true \
    --set controller.stats.enabled=true \
    --set controller.metrics.enabled=true

kubectl --namespace nginx-ingress get services -o wide -w nginx-ingress-controller
kubectl create secret tls default-ingress-tls --key /path/to/private.pem --cert /path/to/cert.pem --namespace nginx-ingress

We need an authentication proxy before the dashboard. I will use keycloak-gatekeeper for that purpose.

nano proxy-deplayment.yaml
---
apiVersion: apps/v1
kind: Deployment
metadata:
  name: dasboard-proxy
  labels:
    app.kubernetes.io/name: dasboard-proxy
  namespace: kubernetes-dashboard
spec:
  replicas: 1
  selector:
    matchLabels:
      app.kubernetes.io/name: dasboard-proxy
  template:
    metadata:
      labels:
        app.kubernetes.io/name: dasboard-proxy
    spec:
      containers:
        - name: dasboard-proxy
          image: "keycloak/keycloak-gatekeeper:latest"
          command:
            - /opt/keycloak-gatekeeper
            - --discovery-url=https://192.168.56.162:8443/auth/realms/mydomain/.well-known/openid-configuration
- --client-id=k8s - --client-secret=43219919-0904-4338-bc0f-c986e1891a7a - --listen=0.0.0.0:3000 - --encryption-key=AgXa7xRcoClDEU0ZDSH4X0XhL5Qy2Z2j - --redirection-url=https://dashboard.nrathi.io - --enable-refresh-tokens=true - --upstream-url=https://kubernetes-dashboard # debug: #- --upstream-url=http://echo:8080 # for self sign cert or custom ca #- --skip-upstream-tls-verify #- --skip-openid-provider-tls-verify ports: - name: http containerPort: 3000 protocol: TCP --- apiVersion: v1 kind: Service metadata: name: dasboard-proxy labels: app.kubernetes.io/name: dasboard-proxy namespace: kubernetes-dashboard spec: type: ClusterIP ports: - port: 3000 targetPort: http protocol: TCP name: http selector: app.kubernetes.io/name: dasboard-proxy --- apiVersion: extensions/v1beta1 kind: Ingress metadata: name: dasboard-proxy annotations: kubernetes.io/ingress.class: nginx nginx.ingress.kubernetes.io/proxy-buffer-size: "64k" cert-manager.io/cluster-issuer: ca-issuer namespace: kubernetes-dashboard spec: tls: - hosts: - dashboard.nrathi.io secretName: dasboard-proxy-tls rules: - host: dashboard.devopstales.intra http: paths: - backend: serviceName: dasboard-proxy servicePort: 3000

Now you can login at dashboard.devopstales.intra but you haven’t got any privileges so lets create. some.

nano devops-group-rbac.yaml
---
apiVersion: rbac.authorization.k8s.io/v1
kind: ClusterRoleBinding
metadata:
  name: devops-cluster-admin
  namespace: kubernetes-dashboard
roleRef:
  apiGroup: rbac.authorization.k8s.io
  kind: ClusterRole
  name: cluster-admin
subjects:
- apiGroup: rbac.authorization.k8s.io
  kind: Group
  name: devopstales
---
kind: RoleBinding
apiVersion: rbac.authorization.k8s.io/v1
subjects:
- kind: User
  name: "devopstales"
  namespace: "kube-system"
roleRef:
  apiGroup: rbac.authorization.k8s.io
  kind: ClusterRole
  name:  cluster-admin

Thursday, April 15, 2021

Kubernetes Dashboard SSO OIDC with keycloak-Part1

 Hello Guys,

For a long time i was working on this how to chive a SSO for k8s dashboard and I have failed many time while setup the sso for my K8S cluster and after searching a lot on internet and putting together a complete documentation how we can achieve it without any buying any domain and with a self sign ssl certs. I was trying to achieve it only with the open source software available and on base metal cluster.

here is my setup looks like for POC.


  1. Vm1 (Pfsense)        192.168.56.100
  2. vm2  (console)        192.168.56.109
  3. vm3   (keycloak)     192.168.56.162
  4. vm4   (master-sso)  192.168.56.164 
for the sake of the simplicity i am not going to include the integration between keycloak and Active directory or OpenLdap i will cover it in another post.

so lets start.

In pfsense which is my router so that i can create a local network on my Laptop it have two interfaces 

1 NAT  2 hostonly adapter and i have stop the DHCP server run by the virtualbox


on Console VM I have installed a  GUI based centos so that i can use browser in that  network.

 yum groupinstall "GNOME Desktop" "Graphical Administration Tools"

Make it boot by default in init 5 mode

 ln -sf /lib/systemd/system/runlevel5.target /etc/systemd/system/default.target

apart form this i have also make the ssh password less auth on keycloak and master-sso server for this 

ssh-keygen -t rsa

ssh-copy-id  root@keycloak

ssh-copy-id  root@master-sso

Setup Keycloak server with Selfsign cert with CA

  • Update & Upgrade your server
apt updateapt upgrade
  • Install JDK 8, keycloak need Java to run
apt-get install openjdk-8-jdk
  • Download keycloak, the program directory will run in /opt
wget https://downloads.jboss.org/keycloak/8.0.2/keycloak-8.0.2.tar.gztar -xzf keycloak-8.0.2.tar.gz -C /opt/mv /opt/keycloak-8.0.2 /opt/keycloak
  • Create user & group for keycloak
groupadd keycloakuseradd -r -g keycloak -d /opt/keycloak -s /sbin/nologin keycloak
  • How to run the keycloak? using systemd service file
mkdir -p /etc/keycloakcp /opt/keycloak/docs/contrib/scripts/systemd/wildfly.conf /etc/keycloak/keycloak.confcp /opt/keycloak/docs/contrib/scripts/systemd/launch.sh /opt/keycloak/bin/cp /opt/keycloak/docs/contrib/scripts/systemd/wildfly.service /etc/systemd/system/keycloak.service
  • Edit launch.sh and specify home environment variable
vi /opt/keycloak/bin/launch.shWILDFLY_HOME='/opt/keycloak/'
  • Edit keycloak service
vi /etc/systemd/system/keycloak.service[Unit]Description=The Keycloak ServerAfter=syslog.target network.targetBefore=httpd.service[Service]Environment=LAUNCH_JBOSS_IN_BACKGROUND=1EnvironmentFile=/etc/keycloak/keycloak.confUser=keycloakGroup=keycloakLimitNOFILE=102642PIDFile=/var/run/keycloak/keycloak.pidExecStart=/opt/keycloak/bin/launch.sh $WILDFLY_MODE $WILDFLY_CONFIG $WILDFLY_BINDStandardOutput=null[Install]WantedBy=multi-user.target
  • Set permission in keycloak directory to user that we create before
chown keycloak:keycloak -R /opt/keycloakchmod o+x /opt/keycloak/bin
  • Start keycloak service
systemctl daemon-reloadsystemctl enable keycloaksystemctl start keycloaksystemctl status keycloak
  • Create admin user
/opt/keycloak/bin/add-user-keycloak.sh -r master -u <username> -p <password>systemctl restart keycloak
  • Open keycloak web
http://IP_SERVER:8080/auth


Secure the Keycloak using SSL

Kubernetes currently not support provider with http, should be https. This tutorial will create self signed CA for keycloak.

  • Create folder for certificate
mkdir -p /opt/kc-certificate
  • Edit openssl configuration
vi /etc/ssl/openssl.cnf# RANDFILE = $ENV::HOME/.rnd
  • Generate CA, I am using wildcard domain.
cd /opt/kc-certificateopenssl genrsa -out ca.key 2048openssl req -new -x509 -key ca.key -out ca.crt -subj "/C=US/ST=CA/O=Acme, Inc./CN=*.nrathi.io"keytool -import -file ca.crt -keystore ca.truststore -keypass PASSWORD -storepass PASSWORD
openssl genrsa -out keycloak.key 2048openssl req -new -key keycloak.key -out keycloak.csr -subj "/C=US/ST=CA/O=Acme, Inc./CN=*.nrathi.io"openssl x509 -req -days 3650 -in keycloak.csr -CA ca.crt -CAkey ca.key -CAcreateserial -out keycloak.crtopenssl pkcs12 -export -in keycloak.crt -inkey keycloak.key -out keycloak.p12 -name myserverkeystore -CAfile ca.crtkeytool -importkeystore -deststorepass PASSWORD -destkeypass PASSWORD -destkeystore keycloak.keystore -srckeystore keycloak.p12 -srcstoretype PKCS12 -srcstorepass PASSWORD

if you ask for password, just add `PASSWORD`

  • Copy generated certificate into keyclock directory
cp ca.truststore /opt/keycloak/standalone/configuration/cp keycloak.keystore /opt/keycloak/standalone/configuration/
  • Change the permission again
chown keycloak:keycloak -R /opt/keycloak
  • Enter to jboss CLI
cd /opt/keycloak/./bin/jboss-cli.shconnect
  • Setup the SSL
/core-service=management/security-realm=ssl-realm:add()/core-service=management/security-realm=ssl-realm/server-identity=ssl:add(keystore-relative-to=jboss.server.config.dir,keystore-path=keycloak.keystore, keystore-password=PASSWORD)/core-service=management/security-realm=ssl-realm/authentication=truststore:add(keystore-relative-to=jboss.server.config.dir,keystore-path=ca.truststore, keystore-password=PASSWORD)/subsystem=undertow/server=default-server/https-listener=https:remove()/subsystem=undertow/server=default-server/https-listener=https:add(socket-binding=https, security-realm=ssl-realm,enable-http2=true, verify-client=REQUESTED)reloadexit
  • Restart Keycloak
systemctl restart keycloak
  • Open keycloak
https://IP_SERVER:8443/auth

you will see warning because self signed certificate, just accept that certificate.


Good, Integration with kubernetes will be in the Part 2.


Thursday, April 30, 2020

Get the list of most popular users on Github by Location and Language

Hello Guys,

recently i have been asked to get the list of most popular users from github and get the github handle and  retrieve the email. and get the output in CSV
many of you think its a typical developers stuff in which we are going to take response and extract the data etc.etc but I have solve the same proble with shell script which i want to share .

#!/bin/bash
read -p "Enter Your language: "  lang
read -p "Enter Your location: "  location
query="language:$lang+location:$location+type:user+repos:>5"
# for debugging..
#echo $query
#curl "https://api.github.com/search/users?q=$query" |grep -v total_count | grep -v incomplete_results |jq -r '.items[] | .login'
echo "GithubHandle, Email"
for i in `curl --silent  "https://api.github.com/search/users?q=$query" |grep -v total_count | grep -v incomplete_results |jq -r '.items[] | .login'`
do
arr=(`curl --silent https://api.github.com/users/$i/events/public|grep '"email":' | sort |uniq | awk -F ':' '{print$2}'|sed 's/,$//'`)
echo "$i,${arr[*]}" 
done

This will do the magic 

Wednesday, March 25, 2020

AWS SAML AUTH with CLI/Programatic access the easiest way

Hello Guys,

As you know from my previous blog that I have setup keycloak server with Azure AD as identity federation now most of you have face the problem about getting the access and secret access key for those role. I have also face the same problem and yet there is no easy solution for this so after much searching on internet i got a radical idea why not use a google chrome plugin, Its not the case i have tried the other solution like saml2aws and other but they want help you if you are login in keycloak using federated identity.so the below method will work with other sso provider as well.
 
1. Search for SAML to AWS key converter & add the plugin to Chrome


2. After adding the extension to the chrome, it will appear as below


We are now ready login AWS through KeyCloak and generate AWS Access Keys.

Login AWS through KeyCloak

1. Click on the below link to login to KeyCloak.
https://keycloakserver/auth/realms//account/applications

2. Login through your sso provider or keycloak


3. After Logging keycloak, navigate to the Application & choose the account to login (eg.AWS application name)

4. After selecting the required application you will be navigated to the AWS account and credentials will be generated for the same. and downloaded in your browser its the most easy way a user can login and have his programmatic access with him.

If you want to say anything please put it in comments


Monday, March 23, 2020

Free SSO with AWS SAML on Prem

Hello Guys,

I started working with a start up and they have about 7 to 8 AWS account and user management in all the AWS account is becoming a problem as well as the users who are leaving the company or in the company also using there programmatic access here and there,
     If we delete or inactive the users then some application is going to stop working so my manager want to came up with plan we have gone through many options and we also have budget issue as its a start up company.so we came up with a plan of using keycloak as our SSO SAML provider backed with postgress and i also want to demonstrate the capability of kubernetes so i deployed it in the kubernetes cluster
   I have use help to install keycloak on the kubernetes cluster which a got from codecentric repo.
https://codecentric.github.io/helm-charts i am also using kubeapps to deploy it in my kubernetes environement.

once install i have started configuring the keycloak
1) First step you need to do is — get saml-metadata.xml from Amazon AWS.
2) After you saved saml-metadata.xml file, go to your Keycloak server, go to “Clients” section and create new client:


your_realm_name — is the name of the keycloak realm, for which you configure SAML client
The only fields you need to fill are:
“Base URL” and “IDP Initiated SSO URL Name”
Set your “Base URL” to:  /auth/realms/<your_realm_name>/protocol/saml/clients/amazon-aws
and “IDP Initiated SSO URL Name” to  amazon-aws
5) Press “Save”
After you saved client settings, go to “Installation” tab, select “Mode Auth Mellon files” and press “Download”  zip file will get downloaded you need to extract the same  and file name idp-metadata.xml

Amazon AWS Service Provider setup

1) After you downloaded idp-metadata.xml file, go to your Amazon AWS account
2) Go to “IAM” section, select “Identity providers” and press “Create Provider” button.
3) Choose “SAML” as the provider type, set provider name and upload idp-metadata.xml file downloaded  and extracted from Keycloak server.

4) Press “Next Step” and then “Create”.
5) After you created your SAML Identity Provider, you need to create IAM role for this provider.
6) Go to “IAM” section, select “Roles”.
7) Press “Create New Role”, set role name.
For “Select Role Type” choose
“SAML 2.0 fedration”
and select your Saml provider which we have created earlier

PART 2: Keycloak Identity Provider setup

1) After IAM SAML role in AWS has been created, go to role summary and copy Role ARN, it should look like this:
arn:aws:iam::aws_acct_id:role/aws_iam_saml_role,arn:aws:iam:aws_acct_id:saml-provider/aws_iam_saml_idp
Go back to your Keycloak server, go to your realm in which you created AWS SAML client, go to “Roles” tab and press “Add Role”:
aws_acct_id — your AWS account ID, aws_iam_saml_role — AWS IAM SAML role, aws_iam_saml_idp — AWS IAM SAML Identity Provider
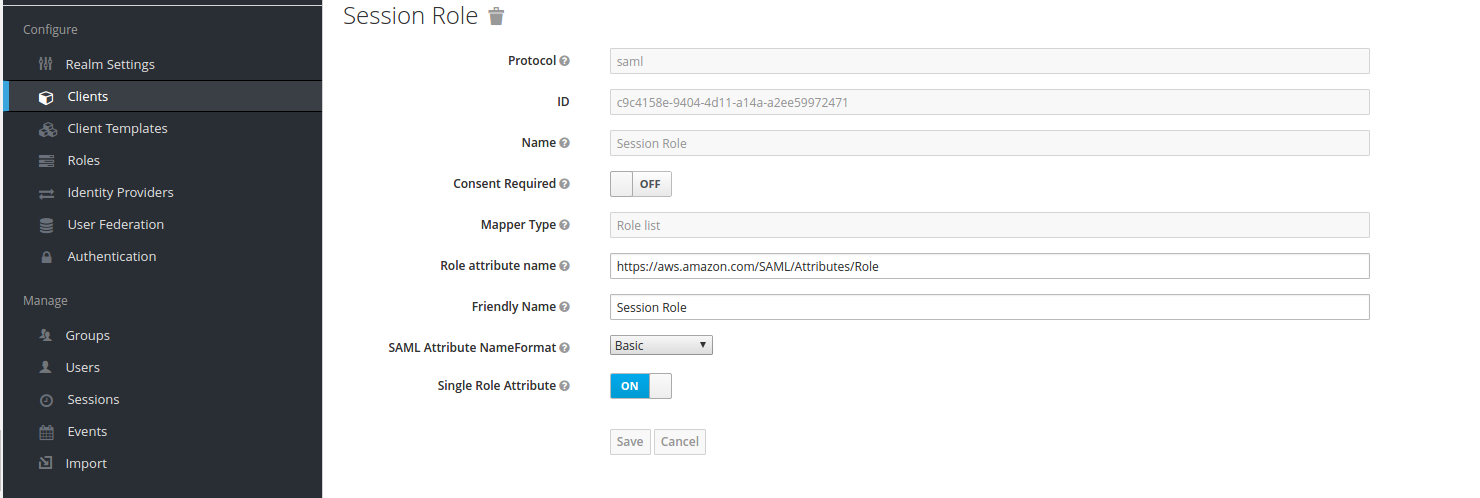
2) After that, go to “Mappers” section and create mappers for “Session Role”“Session Duration” and “Session Name”
“Session Role” mapper:
“Session Name” mapper:
“Session Duration” mapper:
These mappers are required as per Amazon AWS SAML documentation.
3) After “Mappers”, go to Keycloak realm “Manage” section, select “Users” or “Groups” and choose, which group or user will be assigned to AWS SAML role, and assign it:
aws_acct_id — your AWS account ID, aws_iam_saml_role — AWS IAM SAML role, aws_iam_saml_idp — AWS IAM SAML Identity Provideraws_acct_id — your AWS account ID, aws_iam_saml_role — AWS IAM SAML role, aws_iam_saml_idp — AWS IAM SAML Identity Provider
5) And, finally, go back to your defined AWS client, and press “Base URL” link:
your_realm_name — is the name of the keycloak realm, for which you configure SAML clientyour_realm_name — is the name of the keycloak realm, for which you configure SAML client
6) After you press “Base URL” link, it should redirect you to Keycloak login page, where you’ll need to enter user name and password for the user, who is member of a group, which has been assigned to AWS IAM SAML role, defined in Keycloak.
And after you enter your credentials, hopefully, you’ll be redirected to Amazon AWS console.
You can integrate the Keycloak with  Azure AD well.

Click on identity provider select microsoft  and fill the retails as requested Application ID and Application secret and you will be able to authenticate in keycloak using azure AD.

For the CLI/Programatic  access i will get bacl to you in my next blog