Hello boys,
follow All the post of my previous 2 blogs it will help you to setup LDAP server and authenticating client using LDAP now lets move 1 step ahead and start making our ldap server secure.
Enable SSL in OpenLDAP Server
Using encrypted sessions we can secure LDAP communication. Transport Layer Security (TLS) is used for this purpose. Recent releases of slapd in Ubuntu is compiled with support for GnuTLS instead of OpenSSL, there for we need to install following packages now.
Now create the key for slapd and sign it using generated CA.
Once the certificate is generated , now we need to tell LDAP about the created SSL certificate, for that we need to create a LDIF file as below. (/etc/ssl/certinfo.ldif)
Now lets see how to access the secured LDAP server.
Configure DHCP server to access secured LDAP
In http://mageconfig.blogspot.com/2014/10/configure-isc-dhcp-server-with-openldap.html post I have already configured ISC DHCP to communicate with OpenLDAP server, therefor in here I will only show the extra steps required to communicate with secured OpenLDAP server.
In the DHCP server configuration file, change as below and restart the DHCP server.
/etc/dhcp/dhcpd.conf
Configure Ubuntu Server to Authenticate with Secured LDAP
As I have explained the procedure above I will only show you the extra configurations needed. As I have used self sign certificates in here also I will disable certificate checks.
/etc/ldap.conf
Now on client machine I hope you have followed the previous blogs for setup ldap auth .now copy the cacaert.pem from server to client machine as it will required to validate the server certificate.
After that on client machine add the below line
if its promts for password that means every thing is ok and now we can reconfigure the ldap-auth-config
follow All the post of my previous 2 blogs it will help you to setup LDAP server and authenticating client using LDAP now lets move 1 step ahead and start making our ldap server secure.
Enable SSL in OpenLDAP Server
Using encrypted sessions we can secure LDAP communication. Transport Layer Security (TLS) is used for this purpose. Recent releases of slapd in Ubuntu is compiled with support for GnuTLS instead of OpenSSL, there for we need to install following packages now.
$sudo apt-get install gnutls-bin#certtool --generate-privkey > /etc/ssl/private/cakey.pemcn = Example Company
ca
cert_signing_key#certtool --generate-self-signed \
--load-privkey /etc/ssl/private/cakey.pem \
--template /etc/ssl/ca.info \
--outfile /etc/ssl/certs/cacert.pemNow create the key for slapd and sign it using generated CA.
#certtool --generate-privkey \
--outfile /etc/ssl/private/slapd01_key.pemorganization = Example
cn = ldap01.example.com
tls_www_server
encryption_key
signing_key
expiration_days = 3650#certtool --generate-certificate \
--load-privkey /etc/ssl/private/slapd01_key.pem \
--load-ca-certificate /etc/ssl/certs/cacert.pem \
--load-ca-privkey /etc/ssl/private/cakey.pem \
--template /etc/ssl/slapd01.info \
--outfile /etc/ssl/certs/slapd01.pemOnce the certificate is generated , now we need to tell LDAP about the created SSL certificate, for that we need to create a LDIF file as below. (/etc/ssl/certinfo.ldif)
dn: cn=config
add: olcTLSCACertificateFile
olcTLSCACertificateFile: /etc/ssl/certs/cacert.pem
-
add: olcTLSCertificateFile
olcTLSCertificateFile: /etc/ssl/certs/slapd01.pem
-
add: olcTLSCertificateKeyFile
olcTLSCertificateKeyFile: /etc/ssl/private/slapd01_key.pem$sudo ldapmodify -Y EXTERNAL -H ldapi:/// -f /etc/ssl/certinfo.ldif$chown openldap:openldap /etc/ssl/private/cakey.pem \
/etc/ssl/private/slapd01_key.pem /etc/ssl/certs/cacert.pem /etc/ssl/certs/slapd01.pem $chown -R openldap:openldap /etc/ssl/private SLAPD_SERVICES="ldap:/// ldapi:/// ldaps:///"/etc/init.d/slapd restartNow lets see how to access the secured LDAP server.
Configure DHCP server to access secured LDAP
In http://mageconfig.blogspot.com/2014/10/configure-isc-dhcp-server-with-openldap.html post I have already configured ISC DHCP to communicate with OpenLDAP server, therefor in here I will only show the extra steps required to communicate with secured OpenLDAP server.
In the DHCP server configuration file, change as below and restart the DHCP server.
/etc/dhcp/dhcpd.conf
ldap-server                 "localhost";
ldap-port 636;
ldap-ssl ldaps;
ldap-tls-reqcert never; #Telling Not to verify certificates as we have used self sign certs
ldap-base-dn                "ou=dhcp,dc=example,dc=com";
ldap-method                 static;
ldap-debug-file             "/var/log/dhcp-ldap-startup.log";
ldap-dhcp-server-cn         "server"
Configure Ubuntu Server to Authenticate with Secured LDAP
As I have explained the procedure above I will only show you the extra configurations needed. As I have used self sign certificates in here also I will disable certificate checks.
/etc/ldap.conf
.
.
uri ldaps://IpAddressOfLDAPServer:636/
.
.
ssl on
.
.
TLS_REQCERT never
tls_checkpeer no
.
.Now on client machine I hope you have followed the previous blogs for setup ldap auth .now copy the cacaert.pem from server to client machine as it will required to validate the server certificate.
# scp /etc/ssl/certs/cacert.pem root@<ip-address-of-client-mahine>:/etc/ssl/certs/
TLS_REQCERT allow #Which tells not to validate self sign certs
now Its a time for testing guys.
$ldapsearch -x -H ldaps://ldap.example.com -b dc=example,dc=com
if its promts for password that means every thing is ok and now we can reconfigure the ldap-auth-config
$sudo dpkg-reconfigure ldap-auth-config- LDAP server Uniform Resource Identifier: ldaps://LDAP-server-IP-Address
- Change the initial string from "ldapi:///" to "ldap://" before inputing your server's information
- Distinguished name of the search base:
- This should match the value you put in your LDAP server's
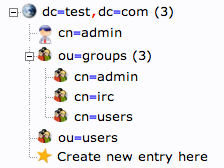
/etc/phpldapadmin/config.phpfile. - Search for: " 'server','base',array " within the file.
- Our example was "dc=test,dc=com"
- This should match the value you put in your LDAP server's
- LDAP version to use: 3
- Make local root Database admin: Yes
- Does the LDAP database require login? No
- LDAP account for root:
- This should also match the value in your
/etc/phpldapadmin/config.php. - Search for: " 'login','bind_id' " within the file
- Our example was "cn=admin,dc=test,dc=com"
- This should also match the value in your
- LDAP root account password: Your-LDAP-root-password
/var/log/authlog
Thanks guys let me know if you still have any questions...