Wednesday, October 14, 2015

Install and configure LDAP server on UBUNTU 14.04

Hello Guys,

I have trying to install and configure LDAP as its like Active Directory from windows   and the reason I have to configure ldap as We have more than 100+users and 100+ servers so creating a new users or adding a new server and granting access to users on that is really a hectic job.so As i googled I found LDAP  in first few like.So I will not waste your time and lets start with implementation of the same.

LDAP, or Lightweight Directory Access Protocol, is a protocol for managing related information from a centralized location through the use of a file and directory hierarchy.It functions in a similar way to a relational database in certain ways, and can be used to organize and store any kind of information. LDAP is commonly used for centralized authentication

Install LDAP

The OpenLDAP server is in Ubuntu's default repositories under the package "slapd", so we can install it easily with apt-get. We will also install some additional utilities:

sudo apt-get update
sudo apt-get install slapd ldap-utils
You will be asked to enter and confirm an administrator password for the administrator LDAP account.

Reconfigure slapd

When the installation is complete, we actually need to reconfigure the LDAP package. Type the following to bring up the package configuration tool:
sudo dpkg-reconfigure slapd
You will be asked a series of questions about how you'd like to configure the software.
  • Omit OpenLDAP server configuration? No
  • DNS domain name?
    • This will create the base structure of your directory path. Read the message to understand how it works.
    • There are no set rules for how to configure this. If you have an actual domain name on this server, you can use that. Otherwise, use whatever you'd like.
    • In this article, we will call it test.com 
  • Organization name?
    • Again, this is up to you
    • We will use example in this guide. 
  • Administrator password?
    • Use the password you configured during installation, or choose another one 
  • Database backend to use? HDB
  • Remove the database when slapd is purged? No
  • Move old database? Yes
  • Allow LDAPv2 protocol? No

Install PHPldapadmin

We will be administering LDAP through a web interface called PHPldapadmin. This is also available in Ubuntu's default repositories.
Install it with this command:
sudo apt-get install phpldapadmin
That will install all of the required web server and PHP dependencies.

Configure PHPldapadmin

We need to configure some values within the web interface configuration files before trying it out.
Open the configuration file with root privileges:
sudo nano /etc/phpldapadmin/config.php
Search for the following sections and modify them accordingly.
Change the red value to the way you will be referencing your server, either through domain name or IP address.
$servers->setValue('server','host','domain_nam_or_IP_address');
For the next part, you will need to reflect the same value you gave when asked for the DNS domain name when we reconfigured "slapd".
You will have to convert it into a format that LDAP understands by separating each domain component. Domain components are anything that is separated by a dot.
These components are then given as values to the "dc" attribute.
For instance, if your DNS domain name entry was "imaginary.lalala.com", LDAP would need to see "dc=imaginary,dc=lalala,dc=com". Edit the following entry to reflect the name you selected (ours is "test.com" as you recall):
$servers->setValue('server','base',array('dc=test,dc=com'));
The next value to modify will use the same domain components that you just set up in the last entry. Add these after the "cn=admin" in the entry below:
$servers->setValue('login','bind_id','cn=admin,dc=test,dc=com');
Search for the following section about the "hidetemplatewarning" attribute. We want to uncomment this line and set the value to "true" to avoid some annoying warnings that are unimportant.
$config->custom->appearance['hide_template_warning'] = true;
Save and close the file.

Log Into the Web Interface

You can access by going to your domain name or IP address followed by "/phpldapadmin" in your web browser:
domain_name_or_IP_address/phpldapadmin
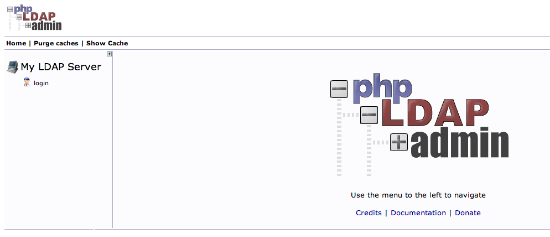
PHPldapadmin inital screen
Click on the "login" link on the left-hand side.
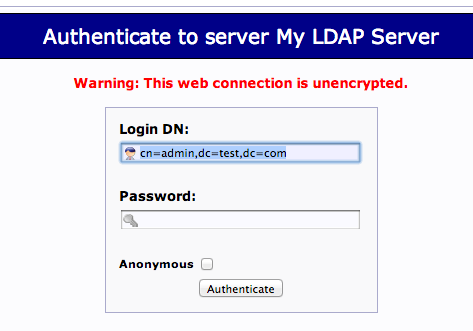
You will receive a login prompt. The correct Login DN (distinguished name) should be pre-populated if you configured PHPldapadmin correctly. In our case, this would be "cn=admin,dc=test,dc=com".
PHPldapadmin login
Enter the password you selected during our slapd configuration.
You will be presented with a rather sparse interface initially.
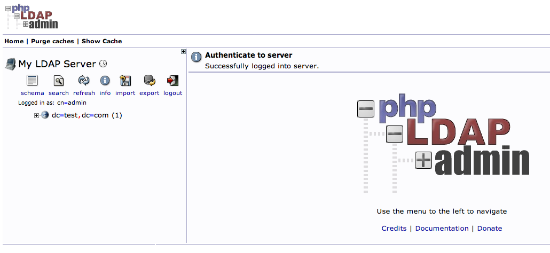
PHPldapadmin logged in
If you click on the "plus" next to the domain components (dc=test,dc=com), you will see the admin login we are using.
PHPldapadmin admin entry

Add Organizational Units, Groups, and Users

LDAP is very flexible. You can create hierarchies and relationships in many different ways, depending on what kind of information you need accessible and what kind of use case you have.
We will create some basic structure to our information and then populate it with information.

Create Organizational Units

First, we will create some categories of information where we will place the later information. Because this is a basic setup, we will only need two categories: groups and users.
Click on the "Create new entry here" link on the left-hand side.
Here, we can see the different kinds of entries we can create.
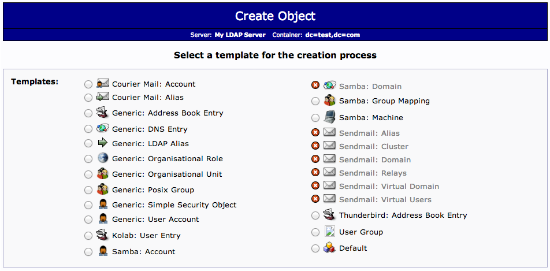
LDAP object selection
Because we are only using this as an organizational structure, rather than an information-heavy entry, we will use the "Generic: Organizational Unit" template.
We will be asked to create a name for our organizational unit. Type "groups":
LDAP groups name
We will then need to commit the changes.
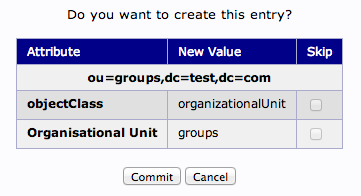
LDAP commit ou
When this is complete, we can see a new entry on the left-hand side.
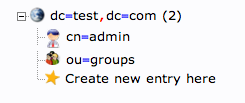
LDAP ou groups
We will create one more organizational structure to get ourselves going. Repeat the procedure, but this time, use the name "users".
When you are done, you should have something that looks like this:
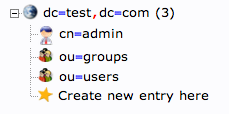
LDAP ou complete

Create Groups

We will be creating three different groups that could be used to organize users into different "access" groups based on the privileges they require.
We will create an "admin" group, an "irc" group, and a "user" group. We could then allow members of different groups to authenticate if we set up client LDAP authentication.
We want to create the groups within the "groups" organizational unit. Click on the "groups" category we created. In the main pane, click on the "Create a child entry" within the groups category.
LDAP child of groups
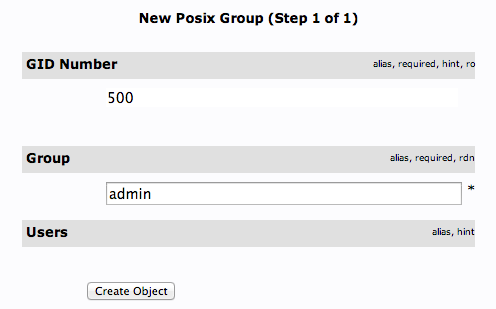
This time, we will choose the "Generic: Posix Group" category.
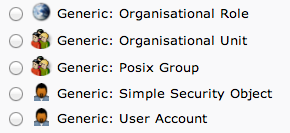
LDAP posix group
Fill in "admin" as the group name. Click "Create Object" and then confirm on the next page.
LDAP admin group
Repeat the process, but simply replace the "admin" name with "irc" and "user". Be sure to re-click the "ou=groups" entry before creating child entries, or else you may create entries under the wrong category.
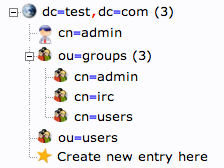
You should now have three groups in the left-hand panel:
LDAP three groups
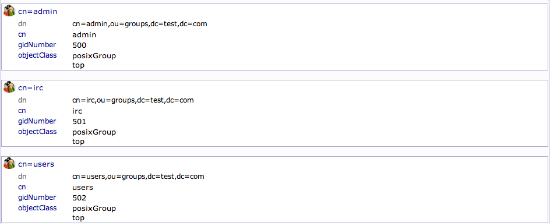
You can see an overview of the entries in the "ou=groups" category by clicking on that entry, and then clicking on "View 3 children":
LDAP view three children

Create Users

Next, we will create users to put in these groups. Start by clicking the "ou=users" category. Click on "Create a child entry".
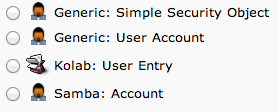
We will choose "Generic: User Account" for these entries.
LDAP user account
While adding a user you can face a tipical problem like there is no textbox for password and instate of textbox there is some error message some thing like this:
"Error trying to get a non-existant value (appearance,password_hash)"
 solution to this problem is as below:
replace password_hash with password_hash_custom which is in  /usr/share/phpldapadmin/lib/TemplateRender.php file on line no 2469  and reload the page
We will be given a lot of fields to fill out:
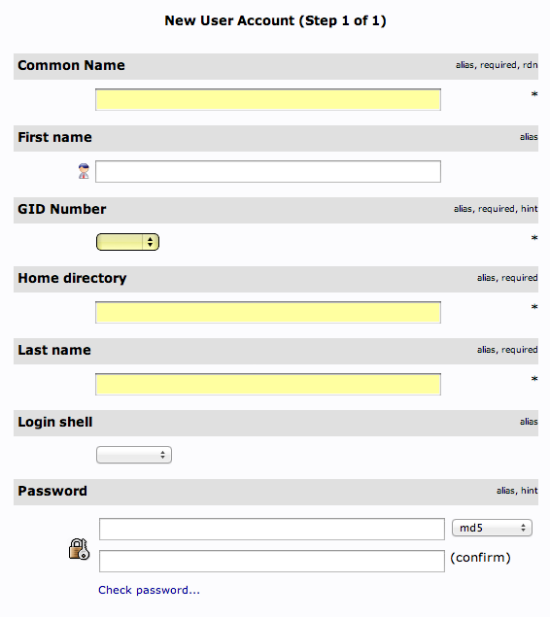
LDAP user fields
Fill in all of the entries with information that makes sense for your user.
Something to keep in mind is that the "Common Name" needs to be unique for each entry in a category. So you may want to use a username format instead of the default "FirstName LastName" that is auto-populated.
Click "Create Object" at the bottom and confirm on the following page.
To create additional users, we will take advantage of the ability to copy entries.
Click on the user you just created in the left-hand panel. In the main pane, click "Copy or move this entry":
LDAP copy user entry
Adjust the "cn=user" portion of the entry to point it to the common name you'd like to use for the new entry. Click "Copy" at the bottom:
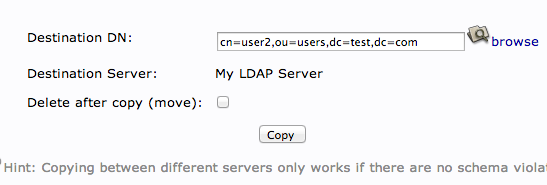
LDAP copy common name
You will be given the next page populated with your first users data. You will need to adjust it to match the new users information.
Be sure to adjust the uidNumber. Click the "Create Object" button at the bottom.

Add Users to Groups

We can add users to various groups by clicking on the group in question. In the main pane, select "Add new attribute":
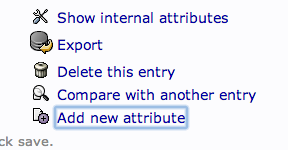
LDAP add new attribute
Select "memberUid" from the drop down menu:
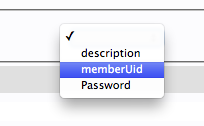
LDAP memberuid entry menu
In the text field that populates, enter the first user you'd like to add. Click "Update Object" at the bottom:
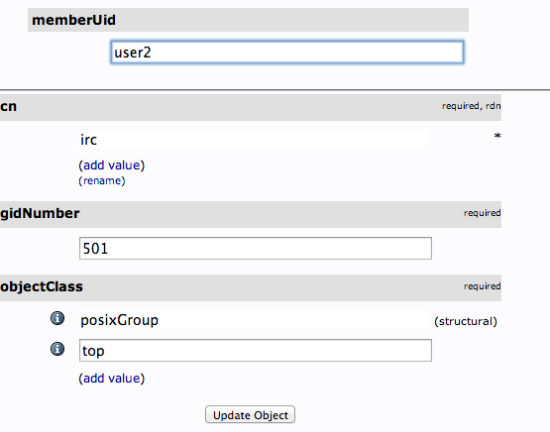
LDAP add user2
You can then add more members by clicking "modify group members" and selecting them from the available choices:
LDAP user choices


I will explane how to use it in next blog which also quite easy.

Thank you guys I will appriciate your feed back if you find any error please let me know .
Enjoy.......!

Saturday, August 8, 2015

self-signed ssl-client-authentication

Hello guys,
welcome back on my blog so lets get start with the stuff.

SSL’s primary function on the Internet is to facilitate encryption and trust that allows a web browser to validate the authenticity of a web site. However, SSL works the other way around too – client SSL certificates can be used to authenticate a client to the web server. Think SSH public/private key pairs, if that is familiar to you. In this blog post I will outline the steps to create a certificate authority certificate, sign a server certificate and install it in Apache, and create a client cert in a format used by web browsers.

Generate a certificate authority (CA) cert

The first step is to generate a CA certificate. This CA certificate does not need to be generated on your web server – it can sit on whatever machine you will use to generate SSL certificates. Once created, the CA cert will act as the trusted authority for both your server and client certs. It is the equivalent of the Verisign or Comodos in the real world of SSL, however you wouldn’t want to use your CA cert for a major public website as its trust isn’t going to be built into browsers everywhere.

Generate your CA certificate using this command:

openssl req -newkey rsa:4096 -keyform PEM -keyout ca.key -x509 -days 3650 -outform PEM -out ca.cer

Then keep them secret – keep them safe. If someone were to get a hold of these files they would be able to generate server and client certs that would be trusted by our web server as it will be configured below

Generate your Apache server SSL key and certificate.

Now that we have our CA cert, we can generate the SSL certificate that will be used by Apache.
  1. Generate a server private key.
    openssl genrsa -out server.key 4096
  2. Use the server private key to generate a certificate generation request.
    openssl req -new -key server.key -out server.req
  3. Use the certificate generation request and the CA cert to generate the server cert.
    openssl x509 -req -in server.req -CA ca.cer -CAkey ca.key -set_serial 100 -extensions server -days 1460 -outform PEM -out server.cer
  4. Clean up – now that the cert has been created, we no longer need the request.
    rm server.req

Install the server certificate in Apache

My server is running Ubuntu 12.04.4 so all paths and commands referenced here are for that operating system.
  1. Copy the CA cert to a permanent place. We’ll need to specify our CA cert in Apache since it is a self generated CA and not one that is included in operating systems everywhere.
    cp ca.cer /etc/ssl/certs/
  2. Copy the server cert and private key to permanent place.
    cp server.cer /etc/ssl/certs/server.crt
    cp server.key /etc/ssl/private/server.key
  3. Activate the SSL module in Apache.
    a2enmod ssl
  4. Activate the SSL site in Apache and disable the HTTP site.
    a2ensite default-ssl
    a2dissite default
  5. Edit /etc/apache2/sites-enabled/000-default-ssl (the config file for the SSL enabled site) and add:
    SSLCACertificateFile /etc/ssl/certs/ca.cer
    SSLCertificateFile    /etc/ssl/certs/server.crt
    SSLCertificateKeyFile /etc/ssl/private/server.key
    SSLVerifyClient require  #This is IMP line to make the thing work
    
  6. Apply the config in Apache.
    service apache2 restart

    Generate a client SSL certificate

    1. Generate a private key for the SSL client.
      openssl genrsa -out client.key 4096
    2. Use the client’s private key to generate a cert request.
      openssl req -new -key client.key -out client.req
    3. Issue the client certificate using the cert request and the CA cert/key.
      openssl x509 -req -in client.req -CA ca.cer -CAkey ca.key -set_serial 101 -extensions client -days 365 -outform PEM -out client.cer
    4. Convert the client certificate and private key to pkcs#12 format for use by browsers.
      openssl pkcs12 -export -inkey client.key -in client.cer -out client.p12
    5. Clean up – remove the client private key, client cert and client request files as the pkcs12 has everything needed.
      rm client.key client.cer client.req
    Looks like a pretty similar process to generating a server certificate, huh?
    Lastly, import the .p12 file into your browser. On Windows you can double click the file to import into the operating system’s keystore that will be used by IE and Chrome. For Firefox, open the Options -> Advanced -> Certificates -> View Certificates -> Your Certificates and import the certificate.
    Now, visit your website with the browser where you imported the client certificate. You’ll likely be prompted for which client certificate to use – select it. Then you’ll be authenticated and allowed in!
Right now if you visit your https site, you will get an SSL error similar to “SSL peer was unable to negotiate an acceptable set of security parameters.” That is good – it means your site won’t accept a connection unless your browser is using a trusted client cert. We’ll generate one now.
as you can see in the below screen you will be only able to access the containt if you have the client cert.I have make few part dark for privacy..Hope you will get it.. Thanks and enjoy...

Tuesday, August 4, 2015

Install HipHop Virtual Machine on Ubuntu 14.04

Hello Guys,
Yesterday during a conversation  with my old friend I come across a  about the HHVM server. so I started looking for it. and as an Linux Administrator I want to know how I can install this and configure this. So here is a procedure.
steps required to install HHVM on Ubuntu 14.04 
The article will also illustrate how HHVM can be used by creating:
  1. A command line 'Hello World' script in PHP
  2. A web based 'Hello World' script written in PHP and served by the HHVM server

Prerequisites

The only prerequisite for this tutorial is a VPS with Ubuntu 14.04 x64 installed. Note that HHVM doesn't support any 32 bit operating system and they have no plans to add support for 32 bit operating systems.

What is HHVM?

HipHop Virtual Machine (HHVM) is a virtual machine developed and open sourced by Facebook to process and execute programs and scripts written in PHP. Facebook developed HHVM because the regular Zend+Apache combination isn't as efficient to serve large applications built in PHP.
According to their website, HHVM has realized over a 9x increase in web request throughput and over a5x reduction in memory consumption for Facebook compared with the Zend PHP engine + APC (which is the current way of hosting a large majority of PHP applications).

Installing HHVM

Installing HHVM is quite straightforward and shouldn't take more than a few minutes. Executing the following 4 commands from the command line will have HHVM installed and ready:
sudo -i && wget -O - http://dl.hhvm.com/conf/hhvm.gpg.key | apt-key add -
echo deb http://dl.hhvm.com/ubuntu trusty main | tee /etc/apt/sources.list.d/hhvm.list
apt-get update
apt-get install hhvm
To confirm that HHVM has been installed, type the following command:
hhvm --help
Integrating your HHVM with existing infrastructure well HHVM  stop supporting the build in web-server so we need to integrate it with apache2 or with NGINX two most popular web servers.

Using HHVM in the FastCGI Mode

Starting with version 3.0, HHVM can no longer be used in the server mode. This section will help you configure HHVM in the FastCGI mode with the Apache and Nginx servers.

With Apache

Configuring HHVM to work in the FastCGI mode with Apache is extremely simple. All you need to do is execute the following following script:
/usr/share/hhvm/install_fastcgi.sh
Running this script configures Apache to start using HHVM to process the PHP code. It'll also restart the Apache server so you don't have to do anything else.

With Nginx

If you are using Nginx with PHP-FPM, you'll have to modify the configuration file to disable the use of PHP-FPM. This file is normally located at /etc/nginx/sites-available/default
Look for the following section and make sure it's all commented (by adding a # at the beginning of each line)
# pass the PHP scripts to FastCGI server listening on 127.0.0.1:9000
#
#location ~ \.php$ {
#       fastcgi_split_path_info ^(.+\.php)(/.+)$;
#       # NOTE: You should have "cgi.fix_pathinfo = 0;" in php.ini
#
#       # With php5-cgi alone:
#       fastcgi_pass 127.0.0.1:9000;
#       # With php5-fpm:
#       fastcgi_pass unix:/var/run/php5-fpm.sock;
#       fastcgi_index index.php;
#       include fastcgi_params;
#}
After doing this, execute the following script:
/usr/share/hhvm/install_fastcgi.sh
after execting the script we need to make a small change in file  /etc/apache2/mods-enabled/hhvm_proxy_fcgi.conf. replance the exesting line 
ProxyPassMatch ^/(.+\.(hh|php)(/.*)?)$ fcgi://127.0.0.1:9000/var/www/$1
with
ProxyPassMatch ^/(.+\.(hh|php)(/.*)?)$ fcgi://127.0.0.1:9000/var/www/html/$1e 
and we are done start the apache web server
Executing this script configures Nginx to start using HHVM to process the PHP code. It'll also restart the Nginx server so you don't have to do anything else.

Confirming that Apache/Nginx is Using HHVM

After you have configured your server to start using HHVM, it's always a good idea to confirm that the server (Apache or Nginx) is indeed using HHVM to process PHP.
You can do this by creating a test PHP file, let's say info.php and putting it in the public folder of your server (typically /var/www/html for Apache and /usr/share/nginx/html for Nginx). Now put the following content in this file:
<?php

echo  defined('HHVM_VERSION')?'Using HHVM':'Not using HHVM';
Now if everything is set up fine, when you access this file in the browser, you should see the following message:
Using HHVM

Important Note

HHVM has incorporated a lot of commonly used PHP extensions, making it easy to port a large number of applications without much fuss. However, if an application uses a PHP extension that hasn't been incorporated yet, choosing HHVM will break the application. The complete list of PHP extensions that have been ported over to HHVM can be found here

Sunday, July 19, 2015

AWS boto ..getting started

Hello Guys,
I have recently started working with aws boto .so i thought lets also make some program and share it with you hope this  will help you.

# /usr/bin/python2.7
# copyleft free software

import boto.ec2
import sys
import os
import subprocess

from boto.ec2.connection import EC2Connection
# specify AWS keys
auth = {"aws_access_key_id": "<aws_user_keyid>", "aws_secret_access_key": "<aws_access_key>"}

def main():
    # read arguments from the command line and
    # check whether at least two elements were entered
    if len(sys.argv) < 2:
print "Usage: python aws.py {start|stop|launch|copy|list} argument\n"
sys.exit(0)
    else:
action = sys.argv[1]
    if action == "start":
startInstance(str(sys.argv[2]))
    elif action == "stop":
    stopInstance(str(sys.argv[2]))
    elif action == "launch":
launchInstance(str(sys.argv[2]))
    elif action == "copy":
copyInstance(str(sys.argv[2]))
    elif action == "list":
          listAMI()
    else:
    print "Usage: python aws.py {start|stop|launch|copy|list} argument\n"
listAMI()

def launchInstance(instance_id):
    print "launching a new instance"
 

    # change "eu-west-1 region if different"
    try:
ec2 = boto.ec2.connect_to_region("eu-west-1",**auth)
dev_sda1 = boto.ec2.blockdevicemapping.EBSBlockDeviceType()
dev_sda1.size = 25 # size in Gigabytes
bdm = boto.ec2.blockdevicemapping.BlockDeviceMapping()
bdm['/dev/sda1'] = dev_sda1
        my_code = """#!/bin/bash
sudo apt-get update -y && sudo apt-get upgrade -y

"""
    except Exception, e1:
error1 ="Error1: %s" % str(e1)
print(error1)
sys.exit(0)
    #Change Instance ID
    try:
        print "instance id is accepted using function %s " % instance_id
      #  sys.exit(0)

        instance = ec2.run_instances(image_id=instance_id,instance_type="m3.medium",key_name="<aws_key_name>",security_group_ids=['<group_id>'],subnet_id="<subnet_id>", instance_initiated_shutdown_behavior='stop',block_device_map=bdm,user_data = my_code)

    except Exception, e2:
        error2 = "Error2: %s" % str(e2)
        print(error2)
        sys.exit(0)

def startInstance(imageid):
    print "Starting the instance..."

    # change "eu-west-1" region if different
    try:
        ec2 = boto.ec2.connect_to_region("eu-west-1", **auth)

    except Exception, e1:
        error1 = "Error1: %s" % str(e1)
        print(error1)
        sys.exit(0)

    # change instance ID appropriately
    try:
         ec2.start_instances(instance_ids=imageid)

    except Exception, e2:
        error2 = "Error2: %s" % str(e2)
        print(error2)
        sys.exit(0)

def stopInstance(imageid):
    print "Stopping the instance..."

    try:
        ec2 = boto.ec2.connect_to_region("eu-west-1", **auth)

    except Exception, e1:
        error1 = "Error1: %s" % str(e1)
        print(error1)
        sys.exit(0)

    try:
         ec2.stop_instances(instance_ids=imageid)

    except Exception, e2:
        error2 = "Error2: %s" % str(e2)
        print(error2)
        sys.exit(0)

def copyInstance(imageid):
    print "Copying  the instance..."

    try:
        ec2 = boto.ec2.connect_to_region("eu-west-1", **auth)

    except Exception, e1:
        error1 = "Error1: %s" % str(e1)
        print(error1)
        sys.exit(0)

    try:
        ec2.copy_image("ap-southeast-1", imageid, name=imageid)
    except Exception, e2:
        error2 = "Error2: %s" % str(e2)
        print(error2)
        sys.exit(0)


def listAMI():

    #ami=idami
    # change "eu-west-1" region if different
    try:
          ec2 = boto.ec2.connect_to_region("eu-west-1", **auth)
          print "connected"
    except Exception, e1:
          error1 = "Error1: %s" % str(e1)
          print(error1)
          sys.exit(0)

    try:
        images = ec2.get_all_images(filters={'owner-id': '<aws_account_no>'})
for img in images:
          # a = str(img.location)
#           print(img.name)
            a=str(img)
            imgname=a[6:]
            print "%s ,%s \n" %(img.name, imgname)
          # print(img.__dict__)
    except Exception, e2:
        error2 = "Error2: %s" % str(e2)
        print(error2)
sys.exit(0)

if __name__ == '__main__':
    main()

Tuesday, June 9, 2015

TRANSPARENT DYNAMIC REVERSE PROXY WITH NGINX

Hello Guys welcome back again on my blog again.
Recently I have change my company and in the new office i got this new unique task of creating a new dynamic transparent dynamic proxy the group of developers working with me.
      so here what I have done to full fill the requirement with nginx.


Here is the sit­u­a­tion. You have a sin­gle pin­hole into your pri­vate net­work. You have a sin­gle ip at your gate­way. You want to serve mul­ti­ple web­sites on your lan that may be run­ning on mul­ti­ple phys­i­cal servers. Rather than open­ing up mul­ti­ple ports and pin­holling to all the dif­fer­ent spots you want to serve, or get­ting more exter­nal ips and doing 1to1 NAT you can use a reverse proxy to be your sin­gle entrance point. The reverse proxy will fetch the con­tent from the back­end server and serve it up.
nginx is a HTTP server and mail proxy server. One of its fea­tures basic HTTPfea­tures is accel­er­ated reverse proxying.
nginx should be avail­able through your pack­age man­ager so just apti­tude (or what­ever your pack­age man­ager is yum, emerge, pac­man) install it.
The con­fig file paths shown are Debian spe­cific but the con­fig itself should work on any distro.
Edit /etc/nginx/sites-available/default and make it look like this
?
1
2
3
4
5
6
7
8
9
10
11
12
13
14
15
16
17
18
19
server {
     listen  :80;
     server_name  _;
     access_log  /var/log/nginx/proxy.access.log;
     location / {
     resolver        127.0.0.1;
     proxy_pass      http://$host$uri;
     proxy_redirect off;
     proxy_set_header        Host    $host;
     proxy_set_header        X-Real-IP $remote_addr;
     proxy_set_header        X-Forwarded-For $proxy_add_x_forwarded_for;
     }
     error_page   500 502 503 504  /50x.html;
     location = /50x.html {
          root   /var/www/nginx-default;
     }
}
So this con­fig causes nginx to lis­ten on all interfaces/ips. server_name _; matches on any­thing so essen­tially this is a catchall now. You can tail proxy.access.log in order to see the requests are they come in and are served.
The loca­tion sec­tion is where the actual prox­y­ing hap­pens. Since this is a dynamic con­fig­u­ra­tion you need to set a resolver where the requested names can be looked up (and over­rid­den for the local lan address). dns­masq reads is dns con­fig­u­ra­tion right out of /etc/hosts. It’s easy to install and con­fig­ure so I rec­comend using it. We will install and con­fig­ure it shortly but for now just leave resolver as 127.0.0.1. proxy_pass does the request­ing of the page we are prox­y­ing. Since this is a trans­par­ent dynamic proxy we just have it request the same thing that was requested of the proxy. proxy_redirect should be set to off since we are just pass­ing on the same request. We need to set a few head­ers for log­files on the back­end servers as well as mak­ing sure that Host is set to the request­ing host in case your using name based vir­tual hosts on your back­end servers. I have left the error page in the default con­fig (at least on debian its default). This pro­vides a nice error mes­sage in case your proxy is work­ing but one of the back­end servers is not. It just serves the index.html that is located in /var/www/nginx-default. Feel free to change that path to some­thing else, mod­ify the index.html or omit the error_page and error page loca­tion sec­tion all together as they aren’t needed for this to work.
Now we need to get that local resolver (dns­masq) installed so we can take our reverse proxy for a spin. Go ahead and apti­tude (or what­ever) install dnsmasq.
At least on debian dns­masq comes out want­ing to serve dhcp. You prob­a­bly do not want this behav­ior. There is also the ques­tion of need­ing access to these same ser­vices by the same name on your LAN. If you need this you might need to do some slight adjust­ing of your dns. I might rec­comend point­ing your main dns to this dns­mask proxy or point­ing all of your clients at this dns­masq install since it will look up other requested names other than those in /etc/hosts. For this exam­ple I will assume you will be want­ing to access these same web ser­vices inter­nally with the same names and bypass the proxy. So I will assume you have either changed your pri­mary dns cacher/resolver (think soho router or what­not) to the address of the proxy server (since its run­ning dns­masq as well), or set all of your clients to point directly at the proxy server for dns. We need to edit the dns­masq con­fig to dis­able dhcp.
Edit /etc/dnsmasq.conf and add no-dhcp-interface=ethx. Do that for every inter­face on your sys­tem so that your not acci­den­tally serv­ing out dhcp to any­one. If somone has a more generic way to dis­able dhcp in dns­masq with­out spec­i­fy­ing each inter­face I would love to know but from read­ing the man this was the only way I could find. So you may have some­thing like the fol­low­ing in you /etc/dnsmasq.conf.
?
1
2
no-dhcp-interface=eth0
no-dhcp-interface=eth1
After mak­ing the change you should be ready to add entries to the proxy servers /etc/hosts for dns­masq to use and then test your reverse proxy.
Lets say you have www.test.com served off of a machine with the ip 192.168.1.2 and you have tickets.office.test.com served off of 192.168.1.3. Lets also assume that your world route­able ip is 123.123.123.123. You will need to make sure that your author­i­ta­tive dns (the real one that servs for test.com has A records for both www.test.com and tickets.office.test.com point­ing to 123.123.123.123. Now on the machine run­ning dns­masq (in this exam­ple also your proxy server) add the fol­low­ing entries to /etc/hosts.
?
1
2
192.168.1.2 www.test.com
192.168.1.3 tickets.office.test.com
Go ahead and restart dns­masq (from mak­ing changes to the con­fig, sub­se­quent changes to /etc/hosts should not require dns­masq restart to pick up changes) and nginx.
Now tail your proxy.access.log file and start mak­ing requests to www.test.com and tickets.office.test.com from both the inside of your lan as well as out­side against your world ip. It should all mag­i­cally serve up the same content.
This type of con­fig can be use­ful in many sit­u­a­tions. You have a small office and bud­get that reflects that not being able to afford mul­ti­ple ips but need­ing to pro­vide web ser­vices behind the fire­wall. You work in a large cor­po­ra­tion where some­one else man­ages the fire­wall and you would like to bring up more web ser­vices with­out wait­ing for the other per­son to make the nec­es­sary changes to the firewall.
One of the other ben­e­fits this pro­vides is being rel­a­tively self doc­u­ment­ing  with regard to what web ser­vices you host behind the fire­wall. (you should be able to see all of them in /etc/hosts since you have to over­ride the dns)

and in the next blog i will tell you how you can achive the same for https i mean dynamic proxy with ssl  ....