Saturday, January 2, 2016

Nagios 4.4.1 on ubuntu 15.04 for Monitoring your Infrastructure

Hello Techies,
Welcome to my blog again.Just looking at the infra motioning few days back in my office.My boss comes with a requirement that he want to monitor on the disk of  all the servers including the developer's environment.I have a choice to write a custom shell script and get  job done or to take it as an opportunity and  configure some robust monitoring which will help me in feature also.
            So I have choose the 2nd way and decided to go with Nagios and put motioning on all the available system not just for only dick checks also for the software and for OS.I have done it in the past but want to do it in easier fashion so the guys with less understanding  with Nagios can also able to add the system so i need a way to do it so I have done a bit a research and come to with this solution
     I have choose Ubuntu 15.04 for Nagios server OS and Nagios 4.1.1 as my Nagios version.
I have installed the ubuntu.

I have installed LAMP stack on the server using the below commands
sudo apt-get install apache2 mysql-server mysql-client php5 php5-mysql php5-gd php5-tidy
Then install the following prerequisites:
sudo apt-get install build-essential libgd2-xpm-dev apache2-utils unzip

Create Nagios User And Group

Create a new nagios user account:
sudo useradd -m nagios
sudo passwd nagios
Create a new nagcmd group for allowing external commands to be submitted through the web interface. Add both the nagios user and the apache user to the group.
sudo groupadd nagcmd
sudo usermod -a -G nagcmd nagios
sudo usermod -a -G nagcmd www-data

Download Nagios And Plugins

Go to the nagios download page, and get the latest version. As of writing this, the latest version was 4.1.1.
wget https://assets.nagios.com/downloads/nagioscore/releases/nagios-4.1.1.tar.gz
And, download nagios plugins too. Nagios plugins allow you to monitor hosts, devices, services, protocols, and applications with Nagios
wget http://www.nagios-plugins.org/download/nagios-plugins-2.1.1.tar.gz

Install Nagios And Plugins

Install nagios:
Go to the folder where you’ve downloaded nagios, and extract it using command:
tar xzf nagios-4.1.1.tar.gz
Change to the nagios directory:
cd nagios-4.1.1/
Run the following commands one by one from the Terminal to compile and install nagios.
sudo ./configure --with-command-group=nagcmd
sudo make all
sudo make install
sudo make install-init
sudo make install-config
sudo make install-commandmode
Install Nagios Web interface:
Enter the following commands to compile and install nagios web interface.
sudo make install-webconf
You may get the following error:
/usr/bin/install -c -m 644 sample-config/httpd.conf /etc/httpd/conf.d/nagios.conf
/usr/bin/install: cannot create regular file ‘/etc/httpd/conf.d/nagios.conf’: No such file or directory
Makefile:296: recipe for target 'install-webconf' failed
make: *** [install-webconf] Error 1
The above error message describes that nagios is trying to create the nagios.conf file inside the /etc/httpd.conf/directory. But, in Ubuntu systems the nagios.conf file should be placed in /etc/apache2/sites-enabled/directory.
So, run the following command instead of using sudo make install-webconf.
sudo /usr/bin/install -c -m 644 sample-config/httpd.conf /etc/apache2/sites-enabled/nagios.conf
Check if nagios.conf is placed in /etc/apache2/sites-enabled directory.
sudo ls -l /etc/apache2/sites-enabled/
Sample output:
total 4
lrwxrwxrwx 1 root root 35 Nov 28 16:49 000-default.conf -> ../sites-available/000-default.conf
-rw-r--r-- 1 root root 1679 Nov 28 17:02 nagios.conf
Create a nagiosadmin account for logging into the Nagios web interface. Remember the password you assign to this account. You’ll need it while logging in to nagios web interface..
sudo htpasswd -c /usr/local/nagios/etc/htpasswd.users nagiosadmin
Restart Apache to make the new settings take effect.
In Ubuntu 15.10/15.04:
sudo systemctl restart apache2
Install Nagios plugins:
Go to the directory where you downloaded the nagios plugins, and extract it.
tar xzf nagios-plugins-2.1.1.tar.gz
Change to the nagios plugins directory:
cd nagios-plugins-2.1.1/
Run the following commands one by one to compile and install it.
sudo ./configure --with-nagios-user=nagios --with-nagios-group=nagios
sudo make
sudo make install
Wait, We are not finished yet.

Configure Nagios

Nagios sample configuration files will be found in the /usr/local/nagios/etc directory. These sample files should work fine for getting started with Nagios. However, if you want, you’ll need to put your actual email ID to receive alerts.
To do that, Edit the /usr/local/nagios/etc/objects/contacts.cfg config file with your favorite editor and change the email address associated with the nagiosadmin contact definition to the address you’d like to use for receiving alerts.
sudo nano /usr/local/nagios/etc/objects/contacts.cfg
Find the following line and enter the email id:
[...]
define contact{
        contact_name                    nagiosadmin             ; Short name of user
        use                             generic-contact         ; Inherit default values from generic-contact template (defined above)
        alias                           Nagios Admin            ; Full name of user
        email                           vijay9867206455@gmail.com  ; <<***** CHANGE THIS TO YOUR EMAIL ADDRESS ******
        }
[...]
Save and close the file.
Then, Edit file /etc/apache2/sites-enabled/nagios.conf,
sudo nano /etc/apache2/sites-enabled/nagios.conf
And edit the following lines if you want to access nagios administrative console from a particular IP series.
Here, I want to allow nagios administrative access from 192.168.1.0/24 series only. So, I edited this file as shown below.
[...]
## Comment the following lines ##
#   Order allow,deny
#   Allow from all
## Uncomment and Change lines as shown below ##
Order deny,allow
Deny from all
Allow from 127.0.0.1 192.168.1.0/24
[...]
Enable Apache’s rewrite and cgi modules:
sudo a2enmod rewrite
sudo a2enmod cgi
Restart apache service.
sudo systemctl restart apache2
Check nagios,conf file for any syntax errors:
sudo /usr/local/nagios/bin/nagios -v /usr/local/nagios/etc/nagios.cfg
If there are no errors, start nagios service and make it to start automatically on every boot.
sudo service nagios start
sudo ln -s /etc/init.d/nagios /etc/rcS.d/S99nagios
Note: In Ubuntu 15.10/15.04, you will see the following error message while starting nagios service.
Failed to start nagios.service: Unit nagios.service failed to load: No such file or directory.
Or
[....] Starting nagios (via systemctl): nagios.serviceFailed to start nagios.service: Unit nagios.service failed to load: No such file or directory.
failed!
To fix this error, copy /etc/init.d/skeleton to /etc/init.d/nagios using the following command:
sudo cp /etc/init.d/skeleton /etc/init.d/nagios
Edit file /etc/init.d/nagios:
sudo nano /etc/init.d/nagios
Add the following lines:
DESC="Nagios"
NAME=nagios
DAEMON=/usr/local/nagios/bin/$NAME
DAEMON_ARGS="-d /usr/local/nagios/etc/nagios.cfg"
PIDFILE=/usr/local/nagios/var/$NAME.lock
Save and close the file.
Finally you need to change the permissions of the file
sudo chmod +x /etc/init.d/nagios
Now, you can start nagios service using command:
sudo /etc/init.d/nagios start

Access Nagios Web Interface

Open up your web browser and navigate to http://nagios-server-ip/nagios and enter the username as nagiosadmin and its password which we created in the earlier steps.

192.168.1.103-nagios – Google Chrome_001
Here it is how Nagios administrative console looks like:

Nagios Core – Google Chrome_002
Click on the “Hosts” section in the left pane of the console. You will see there the no of hosts being monitored by Nagios server. We haven’t added any hosts yet. So it simply monitors the localhost itself only.


Nagios Core – Google Chrome_003
Click on the localhost to display more details:

Nagios Core – Google Chrome_004
That’s it. We have successfully installed and configure Nagios core in our Ubuntu 15.04 server.Till now it all sounds good and we have done with the 1st part of configuring the nagios and its also start monitoring itself locally now We have too add clients to it.
I will couver that in the second part how easily you can add client and configure the alert on it also with some more cool stuff.
Enjoy...
    

Sunday, December 20, 2015

Make your Own private file Sharing server- 1

Hello Guys,
Few days back I have to share some files with my friend and I was searching for a way how to go it.
As the files were confidential I cant put them on Dropbox or on google drive.that time I have share those file using Apache web server with basic authentication.but i was not happy with the way i have share them.so I have started searching a cool way to do it and I come across i really cool way.so Here we go with pydio is a file sharing software.and it has some really cool features like google drive but it will be great it you explore then at your own.
                     So cumming back to installation of pydio it really a cool having a nice webbased GUI and all.so Lets start.
So I have a VM on Amazon having 20GB of disk and 4GB of RAM and Yes the OS is Ubuntu 14.04

Some Basic INFO about the Pydio

Having a private file server is always a best idea. Instead of saving your precious data in the third party servers and Cloud, why not turn your old system into a robust File server, put your data safely in it, and access them anywhere from any device? Sounds good? Let me introduce Pydio, an open source alternative to Dropbox and box.net.
Pydio, formerly known as AjaXplorer, is an open source application that can be used to setup fileserver on any system. It is an alternative to SaaS Boxes and Drives, with more control, safety and privacy, and favorable TCOs. It provides the easy access to files/folders from any system, from any browser over LAN or WAN. It has an embedded WebDAV server and native mobile applications for iOS and Android. It is easy to install, configure and it is designed to provide enterprise grade security and control over your data. Moreover, Pydio users and groups can be mapped directly from your external LDAP/AD server, or from the most common PHP-based CMS.
on the VM use the below command to add the repo and make your life easy.
$ sudo -i 
# echo " deb http://dl.ajaxplorer.info/repos/apt stable main " >> /etc/apt/sources.list
# echo "deb-src http://dl.ajaxplorer.info/repos/apt stable main" >> /etc/apt/sources.list
after that do update the and upgrade

#sudo apt-get update 

# sudo apt-get upgrade
  
#sudo apt-get install pydio*

After all this finish your pydio is installed on your server just few configuration are remaining.

install mysql if it is not install.

#sudo apt-get install mysql-server

mysql> create database pydiodb;
Query OK, 1 row affected (0.05 sec)
mysql> GRANT ALL ON pydiodb.* TO pydiouser@localhost IDENTIFIED BY 'centos';
Query OK, 0 rows affected (0.08 sec)
mysql> flush privileges;
Query OK, 0 rows affected (0.04 sec)
mysql> exit

Then 

sudo  vim /etc/apache2/apache2.conf

find 
<Directory /usr/share>
        AllowOverride None
        Require all granted
</Directory>
 
and replace the None with all so it will look like

<Directory /usr/share>
        AllowOverride All
        Require all granted
</Directory>

and then close the file 
Configuration to reflect the change restart the apache and make the pydio directory writable

#sudo service apache2 restart && chmod -R 777 /usr/share/pydio

Now, open up the browser and type http://domain-name/pydio or http://ip-address/pydio in the address bar.
You will see the following screen. It will show you any warnings or errors if exists. Review the error lines to check what action you should do.
Then, Click on the link that says: click here to continue to Pydio.

Pydio - Google Chrome_001
Click Start Wizard to continue.

Pydio - - - Google Chrome_002
Click on the each section and set the required parameters.

Setup Admin account:
Pydio - - - Google Chrome_003
Set default language and file server title:


Pydio - - - Google Chrome_004
Configure MySQL database name and user. Enter mysql database and user details and click “try connecting to database”. If everything ok, you should see a message: “Connexion established” in the bottom.
Pydio - - - Google Chrome_002Copy the contents shown in the above window and paste them in /usr/share/pydio/.htaccess file.
And we are done doing our configurations
A very nice screen will appear  in front of you and now you can login and explore the features of it at you own or you can refer the manual for it 
Enjoy In the next part I will explain you how you can integrate your Pydio with your Ldap server which will reduce   your overhead of creating the users.
Till Then Enjoy.....
Happy to Help you....!


How to Increase the size of a Linux LVM by expanding the virtual machine disk


Hello Guys,
I was working on my virtual machine and suddenly i got this isssue that i dont have disk space left. and then i started increasing the disk sapce from 20G to make the disk space to 30G.

This post will cover how to increase the disk space for a Oracle VirtualBox virtual machine running Linux that is using logical volume manager (LVM). Firstly we will be increasing the size of the actual disk on the Oracle VirtualBox virtual machine, so at the hardware level – this is the VM’s .vmdk file. Once this is complete we will get into the virtual machine and make the necessary changes through the operating system in order to take advantage of the additional space that has been provided by the hard drive being extended. This will involve creating a new partition with the new space, expanding the volume group and logical group, then finally resizing the file system.

Important Note: Be very careful when working with the commands in this article as they have the potential to cause a lot of damage to your data. If you are working with virtual machines make sure you take a snapshot of your virtual machine beforehand, or otherwise have some other form of up to date backup before proceeding. Note that a snapshot must not be taken until after the virtual disk has been increased, otherwise you will not be able to increase it. It could also be worth cloning the virtual machine first and testing out this method on the clone.
Prerequisites: As this method uses the additional space to create a primary partition, you must not already have 4 partitions as you will not be able to create more than 4. If you do not have space for another partition then you will need to consider a different method, there are some others in the above list.
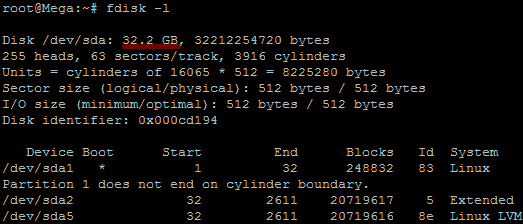
As this method focuses on working with LVM, we will first confirm that our partition type is actually Linux LVM by running the below command.
fdisk -l
fdisk
As you can see in the above image /dev/sda5 is listed as “Linux LVM” and it has the ID of 8e. The 8e hex code shows that it is a Linux LVM, while 83 shows a Linux native partition. Now that we have confirmed we are working with an LVM we can continue. For increasing the size of a Linux native partition
Below is the disk information showing that our initial setup only has the one 20gb disk currently, which is under the logical volume named /dev/mapper/Mega-root – this is what we will be expanding with the new disk.
disk free
Note that /dev/mapper/Mega-root is the volume made up from /dev/sda5 currently – this is what we will be expanding.
first click on windows button on you workstation and then type "cmd"  in then   it will open a command prompt go to path  "C:\Program Files\Oracle\VirtualBox"
 By using Command

C:\Users\nrathi>cd C:\Program Files\Oracle\VirtualBox

after that locate your vdi file for the vm like in my case the path is "C:\Users\nrathi\VirtualBox VMs\ubuntu\ubuntu.vdi"

Then use the below command in the command prompt to increase the dick space

c:\Users\nrathi> "C:\Program Files\Oracle\VirtualBox\VBoxManage.exe" modifyhd   "C:\Users\nrathi\VirtualBox VMs\ubuntu\ubuntu.vdi" --resize 30G

after using this command your disk space will increase to 30G but your Guest os still can access only 20G bacause of the LVM now we need to fix that too 

so lets start doing that.

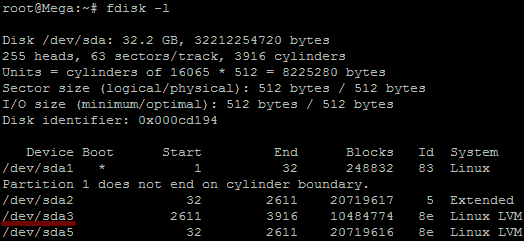
Below is an image after performing this and confirming that the new space is displaying.
fdisk

Partition the new disk space

As outlined in my previous images the disk in my example that I am working with is /dev/sda, so we use fdisk to create a new primary partition to make use of the new expanded disk space. Note that we do not have 4 primary partitions already in place, making this method possible.
fdisk /dev/sda
We are now using fdisk to create a new partition, the inputs I have entered in are shown below in bold. Note that you can press ‘m’ to get a full listing of the fdisk commands.
‘n’ was selected for adding a new partition.
WARNING: DOS-compatible mode is deprecated. It's strongly recommended to
         switch off the mode (command 'c') and change display units to
         sectors (command 'u').

Command (m for help): n
‘p’ is then selected as we are making a primary partition.
Command action
   l   logical (5 or over)
   p   primary partition (1-4)
p
As I already have /dev/sda1 and /dev/sda2 as shown in previous images, I have gone with using ‘3’ for this new partition which will be created as /dev/sda3
Partition number (1-4): 3
We just press enter twice above as by default the first and last cylinders of the unallocated space should be correct. After this the partition is then ready.
First cylinder (2611-3916, default 2611): "enter"
Using default value 2611
Last cylinder, +cylinders or +size{K,M,G} (2611-3916, default 3916): "enter"
Using default value 3916
‘t’ is selected to change to a partition’s system ID, in this case we change to ‘3’ which is the one we just created.
Command (m for help): t
Partition number (1-5): 3
The hex code ‘8e’ was entered as this is the code for a Linux LVM which is what we want this partition to be, as we will be joining it with the original /dev/sda5 Linux LVM.
Hex code (type L to list codes): 8e
Changed system type of partition 3 to 8e (Linux LVM)
‘w’ is used to write the table to disk and exit, basically all the changes that have been done will be saved and then you will be exited from fdisk.
Command (m for help): w
The partition table has been altered!

Calling ioctl() to re-read partition table.

WARNING: Re-reading the partition table failed with error 16: Device or resource busy.
The kernel still uses the old table. The new table will be used at
the next reboot or after you run partprobe(8) or kpartx(8)
Syncing disks.
You will see a warning which basically means in order to use the new table with the changes a system reboot is required. If you can not see the new partition using “fdisk -l” you may be able to run “partprobe -s” to rescan the partitions. In my test I did not require either of those things at this stage (I do a reboot later on), straight after pressing ‘w’ in fdisk I was able to see the new /dev/sda3 partition of my 10gb of space as displayed in the below image.
For CentOS/RHEL run a “partx -a /dev/sda3” to avoid rebooting later on.
fdisk
That’s all for partitioning, we now have a new partition which is making use of the previously unallocated disk space from the increase in VMware.

Increasing the logical volume

We use the pvcreate command which creates a physical volume for later use by the logical volume manager (LVM). In this case the physical volume will be our new /dev/sda3 partition.
root@Mega:~# pvcreate /dev/sda3
  Device /dev/sda3 not found (or ignored by filtering).
In order to get around this you can either reboot, or use partprobe/partx as previously mentioned to avoid a reboot, as in this instance the disk does not appear to be there correctly despite showing in “fdisk -l”. After a reboot or partprobe/partx use the same command which will succeed.
root@Mega:~# pvcreate /dev/sda3
  Physical volume "/dev/sda3" successfully created
Next we need to confirm the name of the current volume group using the vgdisplay command. The name will vary depending on your setup, for me it is the name of my test server. vgdisplay provides lots of information on the volume group, I have only shown the name and the current size of it for this example.
root@Mega:~# vgdisplay
  --- Volume group ---
  VG Name               Mega
...
VG Size               19.76 GiB
Now we extend the ‘Mega’ volume group by adding in the physical volume of /dev/sda3 which we created using the pvcreate command earlier.
root@Mega:~# vgextend Mega /dev/sda3
  Volume group "Mega" successfully extended
Using the pvscan command we scan all disks for physical volumes, this should confirm the original /dev/sda5 partition and the newly created physical volume /dev/sda3
root@Mega:~# pvscan
  PV /dev/sda5   VG Mega   lvm2 [19.76 GiB / 0    free]
  PV /dev/sda3   VG Mega   lvm2 [10.00 GiB / 10.00 GiB free]
  Total: 2 [29.75 GiB] / in use: 2 [29.75 GiB] / in no VG: 0 [0   ]
Next we need to increase the logical volume (rather than the physical volume) which basically means we will be taking our original logical volume and extending it over our new partition/physical volume of /dev/sda3.
Firstly confirm the name of the logical volume using lvdisplay. This name will vary depending on your setup.
root@Mega:~# lvdisplay
  --- Logical volume ---
  LV Name                /dev/Mega/root
The logical volume is then extended using the lvextend command.
root@Mega:~# lvextend /dev/Mega/root /dev/sda3
  Extending logical volume root to 28.90 GiB
  Logical volume root successfully resized
There is then one final step which is to resize the file system so that it can take advantage of this additional space, this is done using the resize2fs command for ext based file systems. Note that this may take some time to complete, it took about 30 seconds for my additional space.
root@Mega:~# resize2fs /dev/Mega/root
resize2fs 1.41.12 (17-May-2010)
Filesystem at /dev/Mega/root is mounted on /; on-line resizing required
old desc_blocks = 2, new_desc_blocks = 2
Performing an on-line resize of /dev/Mega/root to 7576576 (4k) blocks.
The filesystem on /dev/Mega/root is now 7576576 blocks long.
Alternatively if you’re running the XFS file system (default as of RedHat/CentOS 7) you can grow the file system with “xfs_growfs /dev/Mega/root”.
That’s it, now with the ‘df’ command we can see that the total available disk space has been increased.
disk free after expansion

SO We have successfully increase the disk space from 20G to 30G.

Thanks guys.and let me know if you want any help with linux...

Once Again...
Happy To Help You.....

Thursday, October 22, 2015

Setting Secure LDAP and Authenticating client with Secure LDAP Server

Hello boys,

follow All the post of my previous 2 blogs it will help you to setup LDAP server and authenticating client using LDAP now lets move 1 step ahead and start making our ldap server secure.

Enable SSL in OpenLDAP Server

Using encrypted sessions we can secure LDAP communication.  Transport Layer Security (TLS) is used for this purpose. Recent releases of  slapd  in Ubuntu is compiled with support for GnuTLS instead of OpenSSL, there for we need to install following packages now.
$sudo apt-get install gnutls-bin
After that we need to create certificate authority(CA) for this purpose.
#certtool --generate-privkey > /etc/ssl/private/cakey.pem
After that create a template file(/etc/ssl/ca.info) to assist the creation of self-sign CA.
cn = Example Company
ca
cert_signing_key
Now sign the generated CA.
#certtool --generate-self-signed \
--load-privkey /etc/ssl/private/cakey.pem \ 
--template /etc/ssl/ca.info \
--outfile /etc/ssl/certs/cacert.pem


Now create the key for slapd and sign it using generated CA.

#certtool --generate-privkey \
--outfile /etc/ssl/private/slapd01_key.pem
Create a template file.(/etc/ssl/slapd01.info)
organization = Example
cn = ldap01.example.com
tls_www_server
encryption_key
signing_key
expiration_days = 3650
Create a certificate and sign it with previously created CA.
#certtool --generate-certificate \
--load-privkey /etc/ssl/private/slapd01_key.pem \
--load-ca-certificate /etc/ssl/certs/cacert.pem \
--load-ca-privkey /etc/ssl/private/cakey.pem \
--template /etc/ssl/slapd01.info \
--outfile /etc/ssl/certs/slapd01.pem

Once the certificate is generated , now we need to tell LDAP about the created SSL certificate, for that we  need to create a LDIF file as below. (/etc/ssl/certinfo.ldif)
dn: cn=config
add: olcTLSCACertificateFile
olcTLSCACertificateFile: /etc/ssl/certs/cacert.pem
-
add: olcTLSCertificateFile
olcTLSCertificateFile: /etc/ssl/certs/slapd01.pem
-
add: olcTLSCertificateKeyFile
olcTLSCertificateKeyFile: /etc/ssl/private/slapd01_key.pem
Now add it to the LDAP.
$sudo ldapmodify -Y EXTERNAL -H ldapi:/// -f /etc/ssl/certinfo.ldif
Also make sure to grant read access to openldap user to each of below files and locations.
$chown openldap:openldap /etc/ssl/private/cakey.pem \
/etc/ssl/private/slapd01_key.pem  /etc/ssl/certs/cacert.pem   /etc/ssl/certs/slapd01.pem 
$chown -R openldap:openldap /etc/ssl/private 
Now enable SSL in /etc/default/slapd as below and restart the slapd daemon.(add ldaps:/// entry additionally.)
SLAPD_SERVICES="ldap:/// ldapi:/// ldaps:///"
/etc/init.d/slapd  restart

Now lets see how to access the secured LDAP server.

Configure DHCP server to access secured LDAP 

In http://mageconfig.blogspot.com/2014/10/configure-isc-dhcp-server-with-openldap.html  post I have already configured ISC DHCP to communicate with OpenLDAP server, therefor in here I will only show the extra steps required to communicate with secured OpenLDAP server.

In the DHCP server configuration file, change as below and restart the DHCP server.
/etc/dhcp/dhcpd.conf
ldap-server                 "localhost";
ldap-port 636;
ldap-ssl ldaps;
ldap-tls-reqcert never; #Telling Not to verify certificates as we have used self sign certs
ldap-base-dn                "ou=dhcp,dc=example,dc=com";
ldap-method                 static;
ldap-debug-file             "/var/log/dhcp-ldap-startup.log";
ldap-dhcp-server-cn         "server"

Configure Ubuntu Server to Authenticate with Secured LDAP

As I have explained the procedure above I will only show you the extra configurations needed. As I have used self sign certificates in here also I will disable certificate checks.

/etc/ldap.conf

.
.
uri ldaps://IpAddressOfLDAPServer:636/
.
.
ssl on
.
.
TLS_REQCERT never 
tls_checkpeer no . .
  
Now  on client machine I hope you have followed the previous blogs for setup ldap auth .now copy the cacaert.pem from server to client machine as it will required to validate the server certificate.

# scp /etc/ssl/certs/cacert.pem  root@<ip-address-of-client-mahine>:/etc/ssl/certs/

After that on client machine  add the below line

TLS_REQCERT allow #Which tells not to validate self sign certs

now Its a time for testing guys.

$ldapsearch -x  -H ldaps://ldap.example.com -b dc=example,dc=com

if its promts for password that means every thing is ok and now we can reconfigure the ldap-auth-config
$sudo dpkg-reconfigure ldap-auth-config


  • LDAP server Uniform Resource Identifier: ldaps://LDAP-server-IP-Address
    • Change the initial string from "ldapi:///" to "ldap://" before inputing your server's information
  • Distinguished name of the search base:
    • This should match the value you put in your LDAP server's /etc/phpldapadmin/config.phpfile.
    • Search for: " 'server','base',array " within the file.
    • Our example was "dc=test,dc=com"
  • LDAP version to use: 3
  • Make local root Database admin: Yes
  • Does the LDAP database require login? No
  • LDAP account for root:
    • This should also match the value in your /etc/phpldapadmin/config.php.
    • Search for: " 'login','bind_id' " within the file
    • Our example was "cn=admin,dc=test,dc=com"
  • LDAP root account password: Your-LDAP-root-password
and we are done. if you are still not getting authenticated then restart the nscd service as it may happen that connection timeout has happen if its still not working then check into the 

/var/log/authlog

Thanks guys let me know if you still have any questions...