Showing posts with label AWS. Show all posts

Monday, March 23, 2020

Free SSO with AWS SAML on Prem

Hello Guys,

I started working with a start up and they have about 7 to 8 AWS account and user management in all the AWS account is becoming a problem as well as the users who are leaving the company or in the company also using there programmatic access here and there,
     If we delete or inactive the users then some application is going to stop working so my manager want to came up with plan we have gone through many options and we also have budget issue as its a start up company.so we came up with a plan of using keycloak as our SSO SAML provider backed with postgress and i also want to demonstrate the capability of kubernetes so i deployed it in the kubernetes cluster
   I have use help to install keycloak on the kubernetes cluster which a got from codecentric repo.
https://codecentric.github.io/helm-charts i am also using kubeapps to deploy it in my kubernetes environement.

once install i have started configuring the keycloak
1) First step you need to do is — get saml-metadata.xml from Amazon AWS.
2) After you saved saml-metadata.xml file, go to your Keycloak server, go to “Clients” section and create new client:


your_realm_name — is the name of the keycloak realm, for which you configure SAML client
The only fields you need to fill are:
“Base URL” and “IDP Initiated SSO URL Name”
Set your “Base URL” to:  /auth/realms/<your_realm_name>/protocol/saml/clients/amazon-aws
and “IDP Initiated SSO URL Name” to  amazon-aws
5) Press “Save”
After you saved client settings, go to “Installation” tab, select “Mode Auth Mellon files” and press “Download”  zip file will get downloaded you need to extract the same  and file name idp-metadata.xml

Amazon AWS Service Provider setup

1) After you downloaded idp-metadata.xml file, go to your Amazon AWS account
2) Go to “IAM” section, select “Identity providers” and press “Create Provider” button.
3) Choose “SAML” as the provider type, set provider name and upload idp-metadata.xml file downloaded  and extracted from Keycloak server.

4) Press “Next Step” and then “Create”.
5) After you created your SAML Identity Provider, you need to create IAM role for this provider.
6) Go to “IAM” section, select “Roles”.
7) Press “Create New Role”, set role name.
For “Select Role Type” choose
“SAML 2.0 fedration”
and select your Saml provider which we have created earlier

PART 2: Keycloak Identity Provider setup

1) After IAM SAML role in AWS has been created, go to role summary and copy Role ARN, it should look like this:
arn:aws:iam::aws_acct_id:role/aws_iam_saml_role,arn:aws:iam:aws_acct_id:saml-provider/aws_iam_saml_idp
Go back to your Keycloak server, go to your realm in which you created AWS SAML client, go to “Roles” tab and press “Add Role”:
aws_acct_id — your AWS account ID, aws_iam_saml_role — AWS IAM SAML role, aws_iam_saml_idp — AWS IAM SAML Identity Provider
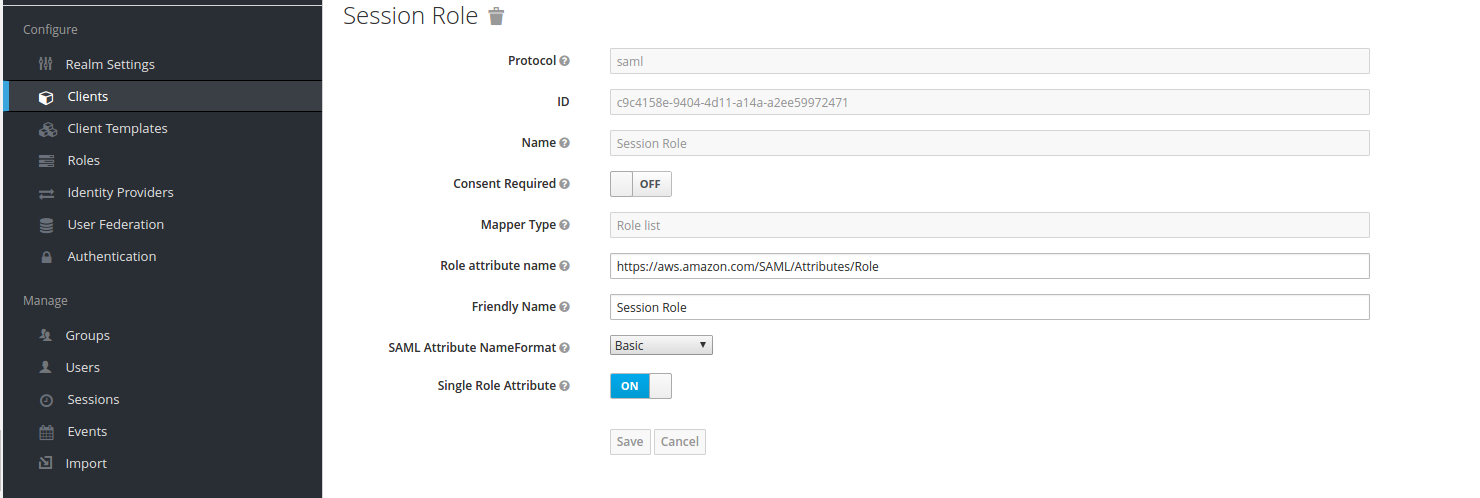
2) After that, go to “Mappers” section and create mappers for “Session Role”“Session Duration” and “Session Name”
“Session Role” mapper:
“Session Name” mapper:
“Session Duration” mapper:
These mappers are required as per Amazon AWS SAML documentation.
3) After “Mappers”, go to Keycloak realm “Manage” section, select “Users” or “Groups” and choose, which group or user will be assigned to AWS SAML role, and assign it:
aws_acct_id — your AWS account ID, aws_iam_saml_role — AWS IAM SAML role, aws_iam_saml_idp — AWS IAM SAML Identity Provideraws_acct_id — your AWS account ID, aws_iam_saml_role — AWS IAM SAML role, aws_iam_saml_idp — AWS IAM SAML Identity Provider
5) And, finally, go back to your defined AWS client, and press “Base URL” link:
your_realm_name — is the name of the keycloak realm, for which you configure SAML clientyour_realm_name — is the name of the keycloak realm, for which you configure SAML client
6) After you press “Base URL” link, it should redirect you to Keycloak login page, where you’ll need to enter user name and password for the user, who is member of a group, which has been assigned to AWS IAM SAML role, defined in Keycloak.
And after you enter your credentials, hopefully, you’ll be redirected to Amazon AWS console.
You can integrate the Keycloak with  Azure AD well.

Click on identity provider select microsoft  and fill the retails as requested Application ID and Application secret and you will be able to authenticate in keycloak using azure AD.

For the CLI/Programatic  access i will get bacl to you in my next blog 


Friday, July 27, 2018

AWS Lambda To start and Stop Instance as Per the Schedule Tag

Hello Guys,

I have recently join a new company and development team is used to work in the India working hours and rest of the time the Servers on the AWS are remaining ideal/utilized rest of the day. so they want to reduce the cost so they come to me and ask for the strategy to reduce cost so I suggested to go have shut down the machine/servers in non-working hours which they agree but  they want a governing mechanism to enforce this so I have  come up with a lambda function which allow them to customized startup and stop time as well as they don't need to manually start and stop the same. As i need to implement the same functionality on the 25 account so I have written a lambda function and then put it in a cloud formation and provided them and ask them to execute this in the account and then just add tag name "schedule" and value of start and stop time in UTC as the lambda is run on the UTC lambda function will take care of the rest.
To further reduce costs of our EC2 instances, we determined some instances that are running 24/7 unnecessarily. An automated process to schedule stop and start instances would greatly help cutting costs. Of course, the solution itself should not add an extra instance to our infrastructure. The solution must be an example of serverless computing.
Automatically stop running EC2 instances 24/7 unnecessarily
We created a lambda function that scans all instances for a specific tag. The tag we use is named ‘Schedule’ and contains the desired ‘runtime’ for the specific instance. Instances without a Schedule tag will not be affected. We support the following content format in the Schedule tag:
08:00-19:15   start the instance at 08:00, stop it at 19:15
21:00-07:45   start the instance at 21:00, stop it at 07:45 the next day
-17:45              stop this instance at 17:45 today
-16:30T           Terminate instance at 16:30 today
# whatever     Anything starting with a # is totally ignored
NOTE: All times are UTC times!
Invalid tag-content is automatically prefixed with an # so that it is ignored in future invocations of the lambda function. Also instances with only an end-time will have their tag rewritten to avoid restarts at 00:00.
Our lambda function is written in python using boto3 for AWS integration. The function requires a role to be able to interact with EC2. The lambda function has to be able to read and change tags, stop and start instances and even terminate them!
To further automate the process, we need to automatically execute the lambda function, which can be achieved by creating a CloudWatch Event Rule. It is a bit of a funny place for a schedule, but that’s where you configure it. The event will be used as a trigger to start our lambda function.
The scheduler we create in the stack runs the lambda function every 10 minutes, giving your EC2 scheduler a granularity of 6 runs per hour.
As shown in the below screenshot One need to just add the tag “Schedule” and required timing against it and it will start and stop the instance at the given time. 


Below is the attached cloud formation template .
{
  "AWSTemplateFormatVersion": "2010-09-09",
  
  "Description" : "[INFRA] Lambda code to start/stop EC2 instances based on tag Schedule. Examples of valid content for Schedule tag are: 08:00-18:00 EC2 instance will run from 08:00 till 18:00 every day. -17:00 wil stop the instance today at 17:00 and rewrite the tag to #-17:00. -17:00T will TERMINATE the instance at 17:00. Any invalid content will be rewritten to start with a #. Any content starting with # will be ignored",
  "Resources" : {
  
    "EC2SchedulerLambda": {
      "Type": "AWS::Lambda::Function",
      "Properties": {
        "Handler": "index.EC2Scheduler",
        "FunctionName" : "EC2Scheduler",
"Description" : "[INFRA] Lambda code to start/stop EC2 instances based on tag Schedule. NOTE times are UTC. See stack description for further information",
        "Role": { "Fn::GetAtt" : ["EC2SchedulerRole", "Arn"] },
        "Code": {
          "ZipFile":  { "Fn::Join": ["\n", [
"from datetime import datetime, time",
"import boto3",
"import re",
"",
" theTag='Schedule'",
"",
"doLog = True",
"",
"def EC2Scheduler(event, context):",
"",
"  now = datetime.now().replace(second=0, microsecond=0)",
"",
"  if doLog:",
"    print 'Reference time is ', now.time()",
"",
"  ec2 = boto3.resource('ec2')",
"",
"  allInstances = ec2.instances.filter(Filters=[{'Name': 'instance-state-name', 'Values': ['running', 'stopped']}])",
"",
"  for instance in allInstances:",
"    if instance.tags :",
"      for tag in instance.tags:",
"        if tag['Key'] == theTag :",
"          Range=tag['Value']",
"",
"          if doLog :",
"            print instance.instance_id, ",
"",
"          shouldrun=shouldRunNow(instance, now, Range)",
"",
"          if doLog :",
"            print 'should %s' %( 'run' if shouldrun else 'NOT run'),",
"",
"          alignInstance(instance, shouldrun)",
"",
"def shouldRunNow(instance, now, tRange):",
"",
"  currentState = instance.state['Code'] == 16",
"",
"  # is the tRange commented out",
"",
"  if tRange[0:1] == '#':",
"    if doLog:",
"      print 'Range starts with # -- no changes',",
"    return currentState",
"",
"  # does the time indicate an end-time only [eg -13:15]",
"",
"  if tRange[0:1] == '-':",
"    tEnd=time(int(tRange[1:3]),int(tRange[4:6]))",
"",
"    if doLog:",
"      print 'End time:', tEnd,",
"",
"    if now.time() > tEnd:",
"",
"      msg='stop'",
"      if tRange[6:7] == 'T':",
"",
"        terminateAllowed=instance.describe_attribute(Attribute='disableApiTermination')['DisableApiTermination']['Value'] == False",
"",
"        if terminateAllowed:",
"          instance.modify_attribute( Attribute='instanceInitiatedShutdownBehavior', Value='terminate' )",
"          msg='terminate'",
"        else:",
"          msg='stop [terminate not allowed]'",
"",
"      # re-tag",
"",
"      instance.delete_tags(Tags=[{'Key': theTag, 'Value': tRange}])",
"      instance.create_tags(Tags=[{'Key': theTag, 'Value': '#'+msg+'@'+tRange}])",
"",
"      if doLog:",
"        print 'time to ', msg, ",
"",
"      return False",
"",
"    else:",
"      # leave instance in current state",
"      if doLog:",
"        print 'NO time to stop (yet) ',",
"      return currentState",
"",
"  # some simple checks for tRange",
"",
"  if not re.match('\\d{2}:\\d{2}-\\d{2}:\\d{2}',tRange):",
"    if doLog:",
"      print 'error in format of tag: >', tRange, '< -- no changes required ',",
"",
"    instance.delete_tags(Tags=[{'Key': theTag}, {'Value': tRange}])",
"    instance.create_tags(Tags=[{'Key': theTag, 'Value': '# Err: '+tRange}])",
"",
"    return currentState",
"",
"  tStart=time(int(tRange[0:2]),int(tRange[3:5]))",
"  tEnd=time(int(tRange[6:8]),int(tRange[9:11]))",
"",
"  inInterval = False",
"    ",
"  # first case, start < end --> same day",
"",
"  if tStart < tEnd:",
"    if tStart <= now.time() <= tEnd:        ",
"      inInterval = True ",
"",
"  # second case, end < start --> carry over to next day",
"",
"  else:",
"    if tStart <= now.time() <= time(23,59) or time(0,0) <= now.time() <= tEnd:",
"      inInterval = True",
"",
"  if doLog :",
"    print 'Ref time is %s interval' %( 'in' if inInterval else 'NOT in'), tRange, ",
"",
"  return inInterval",
"",
"def alignInstance(inst, requiredOn):",
"",
"  actualOn = inst.state['Code'] == 16 ",
"  msg='is compliant'",
"",
"  if actualOn != requiredOn:",
"    if requiredOn == True:",
"      msg='starting'",
"      inst.start()",
"    else:",
"      termReq=inst.describe_attribute(Attribute='instanceInitiatedShutdownBehavior')['InstanceInitiatedShutdownBehavior']['Value'] == 'terminate'",
"",
"      if termReq:",
"        msg='terminating'",
"        inst.terminate()",
"      else:",
"        msg='stopping'",
"        inst.stop()",
"",
"  if doLog:",
"    print '-->', msg",
""
  ]]}
        },
        "Runtime": "python2.7"
      }
    },
    
    "EC2SchedulerTick": {
      "Type": "AWS::Events::Rule",
      "Properties": {
"Description": "ScheduledRule for EC2Scheduler",
"ScheduleExpression": "rate(10 minutes)",
        "Name" : "EC2SchedulerTick",
"State": "ENABLED",
"Targets": [{
  "Arn": { "Fn::GetAtt": ["EC2SchedulerLambda", "Arn"] },
  "Id": "TargetFunctionV1"
}]
      }
    },
    "PermissionForEventsToInvokeLambda": {
      "Type": "AWS::Lambda::Permission",
      "Properties": {
"FunctionName": { "Ref": "EC2SchedulerLambda" },
"Action": "lambda:InvokeFunction",
"Principal": "events.amazonaws.com",
"SourceArn": { "Fn::GetAtt": ["EC2SchedulerTick", "Arn"] }
      }
    },
    "EC2SchedulerRole": {
      "Type": "AWS::IAM::Role",
      "Properties": {
        "AssumeRolePolicyDocument": {
          "Version": "2012-10-17",
          "Statement": [{ "Effect": "Allow", "Principal": {"Service": ["lambda.amazonaws.com"]}, "Action": ["sts:AssumeRole"] }]
        },
        "Path": "/",
        "RoleName" : "EC2SchedulerRole",
        "Policies": [{
          "PolicyName": "EC2SchedulerPolicy",
          "PolicyDocument": {
            "Version": "2012-10-17",
            "Statement": [
    {
"Effect": "Allow",
"Action": ["logs:*"], 
"Resource": "arn:aws:logs:*:*:*" 
    },
    {
"Effect": "Allow",
"Action": ["ec2:*"], 
"Resource": "*"
    }]
          }
        }]
      }
    }
  }

}

this is it, Enjoy...

Tuesday, September 20, 2016

List All the instances of AWS account using boto3 script


Hello Guys,
recently my boss has a requirement.He want to list all the instances of the AWS account across
the regions.So I have use boto3 library and so that we can use it any where with minimal setup.
  so I wrote a boto script to get it done.Here is the procedure to use it.step by step.

I am using ubuntu 16.04 as an operating system.below procedure  will also work fine with 
the ubuntu 14.04 as well.

1. Installation:

#sudo apt-get install python-softwware-properties

#sudo apt-get install  python-pip

#sudo pip install boto3
 
2. Configuring the boto3 library
 
Here we need to create few files like ~/.aws/credentials and ~/.aws/config
 
$ touch ~/.aws/credentials

 #Below are the contains of the file replace the foo and bar with the id and access key of your 
 AWS account

[default] 
aws_access_key_id=foo
aws_secret_access_key=bar
 
 
$ touch ~/.aws/config

#add the below containts to the file

region=us-west-2

and after this copy the below script and and execute it but remember in python orientation 
matters so dot change the orientation or the script will stop working.    


#!/usr/bin/env   python
from collections import defaultdict
"""
This script is Written by N.N.R.
on 12-09-16
"""
import boto3
"""
A tool for retrieving basic information from the running EC2 instances.
"""
client = boto3.client('ec2')
regions = client.describe_regions()['Regions']
for region in regions:
     region_name=region['RegionName']
# Connect to EC2
for region in regions:
 print("below are the instances running in")
 region_name=region['RegionName']
 print(region_name)
 ec2 = boto3.resource('ec2',region_name=region['RegionName'])
# Get information for all running instances
 running_instances = ec2.instances.filter(Filters=[{
    'Name': 'instance-state-name',
    'Values': ['running']}])
 ec2info = defaultdict()
 for instance in running_instances:
    for tag in instance.tags:
        if 'Name'in tag['Key']:
            name = tag['Value']
    # Add instance info to a dictionary
    ec2info[instance.id] = {
        'Name': name,
        'Type': instance.instance_type,
        'State': instance.state['Name'],
        'Private IP': instance.private_ip_address,
        'Public IP': instance.public_ip_address,
        'Launch Time': instance.launch_time
        }
 attributes = ['Name', 'Type', 'State', 'Private IP', 'Public IP', 'Launch Time']
 for instance_id, instance in ec2info.items():
    for key in attributes:
        print("{0}: {1}".format(key, instance[key]))
    print("------")


and Let me know if you have any issue with the script.