Hello Guys,
I started working with a start up and they have about 7 to 8 AWS account and user management in all the AWS account is becoming a problem as well as the users who are leaving the company or in the company also using there programmatic access here and there,
If we delete or inactive the users then some application is going to stop working so my manager want to came up with plan we have gone through many options and we also have budget issue as its a start up company.so we came up with a plan of using keycloak as our SSO SAML provider backed with postgress and i also want to demonstrate the capability of kubernetes so i deployed it in the kubernetes cluster
I have use help to install keycloak on the kubernetes cluster which a got from codecentric repo.
https://codecentric.github.io/helm-charts i am also using kubeapps to deploy it in my kubernetes environement.
once install i have started configuring the keycloak

aws_acct_id — your AWS account ID, aws_iam_saml_role — AWS IAM SAML role, aws_iam_saml_idp — AWS IAM SAML Identity Provider


 aws_acct_id — your AWS account ID, aws_iam_saml_role — AWS IAM SAML role, aws_iam_saml_idp — AWS IAM SAML Identity Provider
 your_realm_name — is the name of the keycloak realm, for which you configure SAML client
I started working with a start up and they have about 7 to 8 AWS account and user management in all the AWS account is becoming a problem as well as the users who are leaving the company or in the company also using there programmatic access here and there,
If we delete or inactive the users then some application is going to stop working so my manager want to came up with plan we have gone through many options and we also have budget issue as its a start up company.so we came up with a plan of using keycloak as our SSO SAML provider backed with postgress and i also want to demonstrate the capability of kubernetes so i deployed it in the kubernetes cluster
I have use help to install keycloak on the kubernetes cluster which a got from codecentric repo.
https://codecentric.github.io/helm-charts i am also using kubeapps to deploy it in my kubernetes environement.
once install i have started configuring the keycloak
1) First step you need to do is — get saml-metadata.xml from Amazon AWS.
2) After you saved saml-metadata.xml file, go to your Keycloak server, go to “Clients” section and create new client:
your_realm_name — is the name of the keycloak realm, for which you configure SAML client
The only fields you need to fill are:
“Base URL” and “IDP Initiated SSO URL Name”
Set your “Base URL” to: /auth/realms/<your_realm_name>/protocol/saml/clients/amazon-aws
and “IDP Initiated SSO URL Name” to amazon-aws
5) Press “Save”
After you saved client settings, go to “Installation” tab, select “Mode Auth Mellon files” and press “Download” zip file will get downloaded you need to extract the same and file name idp-metadata.xml
Amazon AWS Service Provider setup
1) After you downloaded idp-metadata.xml file, go to your Amazon AWS account
2) Go to “IAM” section, select “Identity providers” and press “Create Provider” button.
3) Choose “SAML” as the provider type, set provider name and upload idp-metadata.xml file downloaded and extracted from Keycloak server.
4) Press “Next Step” and then “Create”.
5) After you created your SAML Identity Provider, you need to create IAM role for this provider.
6) Go to “IAM” section, select “Roles”.
7) Press “Create New Role”, set role name.
For “Select Role Type” choose
“SAML 2.0 fedration”
and select your Saml provider which we have created earlier
PART 2: Keycloak Identity Provider setup
1) After IAM SAML role in AWS has been created, go to role summary and copy Role ARN, it should look like this:
arn:aws:iam::aws_acct_id:role/aws_iam_saml_role,arn:aws:iam:aws_acct_id:saml-provider/aws_iam_saml_idp
Go back to your Keycloak server, go to your realm in which you created AWS SAML client, go to “Roles” tab and press “Add Role”:

aws_acct_id — your AWS account ID, aws_iam_saml_role — AWS IAM SAML role, aws_iam_saml_idp — AWS IAM SAML Identity Provider
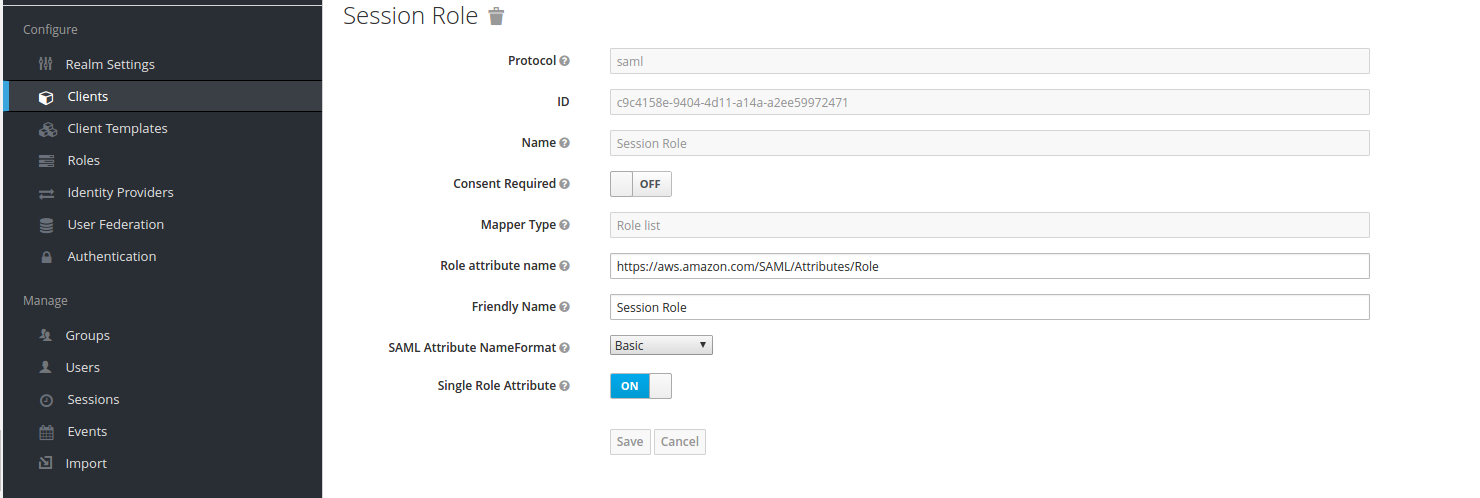
2) After that, go to “Mappers” section and create mappers for “Session Role”, “Session Duration” and “Session Name”
“Session Role” mapper:

“Session Name” mapper:

“Session Duration” mapper:

These mappers are required as per Amazon AWS SAML documentation.
3) After “Mappers”, go to Keycloak realm “Manage” section, select “Users” or “Groups” and choose, which group or user will be assigned to AWS SAML role, and assign it:
 aws_acct_id — your AWS account ID, aws_iam_saml_role — AWS IAM SAML role, aws_iam_saml_idp — AWS IAM SAML Identity Provider
5) And, finally, go back to your defined AWS client, and press “Base URL” link:
 your_realm_name — is the name of the keycloak realm, for which you configure SAML client
6) After you press “Base URL” link, it should redirect you to Keycloak login page, where you’ll need to enter user name and password for the user, who is member of a group, which has been assigned to AWS IAM SAML role, defined in Keycloak.
And after you enter your credentials, hopefully, you’ll be redirected to Amazon AWS console.
You can integrate the Keycloak with Azure AD well.
Click on identity provider select microsoft and fill the retails as requested Application ID and Application secret and you will be able to authenticate in keycloak using azure AD.
For the CLI/Programatic access i will get bacl to you in my next blog


